

Summary Card
Overview
Microsurgery enables precise anastomosis of small vessels and nerves, forming the foundation of modern reconstructive techniques including free flaps, nerve repair, replantation, & lymphatic surgery.
Clinical Use
Microsurgical reconstruction enables vascularised tissue transfer and nerve repair for functional and aesthetic restoration, especially when simpler options are unavailable or inadequate.
Microsurgical Principles & Surgical Environment
Successful microsurgery depends as much on the setup and environment as the anastomosis itself; ergonomic posture, precise planning, & optical system minimise fatigue to maximise precision.
Instrumentation
Microsurgical success depends on fine-tipped, atraumatic instruments, ultra-thin sutures, and adjunct tools like couplers and background mats that enhance precision and reduce operative time.
Technique
Success in microsurgery hinges on meticulous vessel preparation, selecting the correct anastomotic technique, and tailoring your suturing strategy to minimize flow disturbances and technical failure.
Monitoring & Complications
Flap failure in microsurgery is most commonly due to technical errors or thrombosis. A systematic approach to patency testing, flap monitoring, & early re-exploration can significantly improve outcomes.
Primary Contributor: Dr Hatan Mortada, Educational Fellow
Verified by thePlasticsFella ✅
Overview of Microsurgical Principles & Techniques
Microsurgery enables precise reconstructions by anastomosing small vessels and nerves under magnification, forming the backbone of modern free flap, nerve, replantation, and lymphatic surgery.
Microsurgery involves operating on vessels and nerves ≤2 mm using loupes or microscopes, fine instruments, and microsutures (8-0 to 11-0). It is the cornerstone of reconstructive plastic surgery, that enables free flaps, nerve repair, replantation, and lymphatic surgery when local tissue or function needs precise restoration.
It has evolved into 3 major domains:
- Microvascular Surgery: Vessel repair and free flap transfer.
- Microneural Repair: Direct nerve repair or grafting with functional recovery.
- Supermicrosurgery: For vessels <0.8 mm, used in lymphatic and perforator flap surgery.
Evolution of Microsurgery
- 1902 – Carrel: Introduced vascular triangulation for anastomosis (Nobel Prize) (Carrel, 1912).
- 1960 – Jacobson & Suarez: First microvascular anastomosis using a microscope.
- 1964–68 – Replantation Era: Arm (Malt & McKhann) and digit (Komatsu & Tamai) reattachments.
- 1973 – Daniel & Taylor: First clinical free flap (groin flap).
- 1989 – Koshima & Soeda: Introduced DIEP flap; start of perforator flap era.
- 2000s–Present: Advances in supermicrosurgery, robotics, and face/hand transplantation.
Microsurgery routinely uses 8-0 to 11-0 monofilament sutures, which are thinner than a human hair.
Clinical Use of Microsurgical Principles
Microsurgical reconstruction enables vascularised tissue transfer and nerve repair for functional and aesthetic restoration, especially when simpler options are unavailable or inadequate.
Microsurgery allows complex reconstructions with precision and versatility, enabling the transfer of vascularised tissue and the restoration of function through nerve and muscle coaptation. It is now often the first-line solution; an evolution from the traditional “reconstructive ladder” to the more direct “reconstructive elevator” model (Khouri, 1998).
Indications
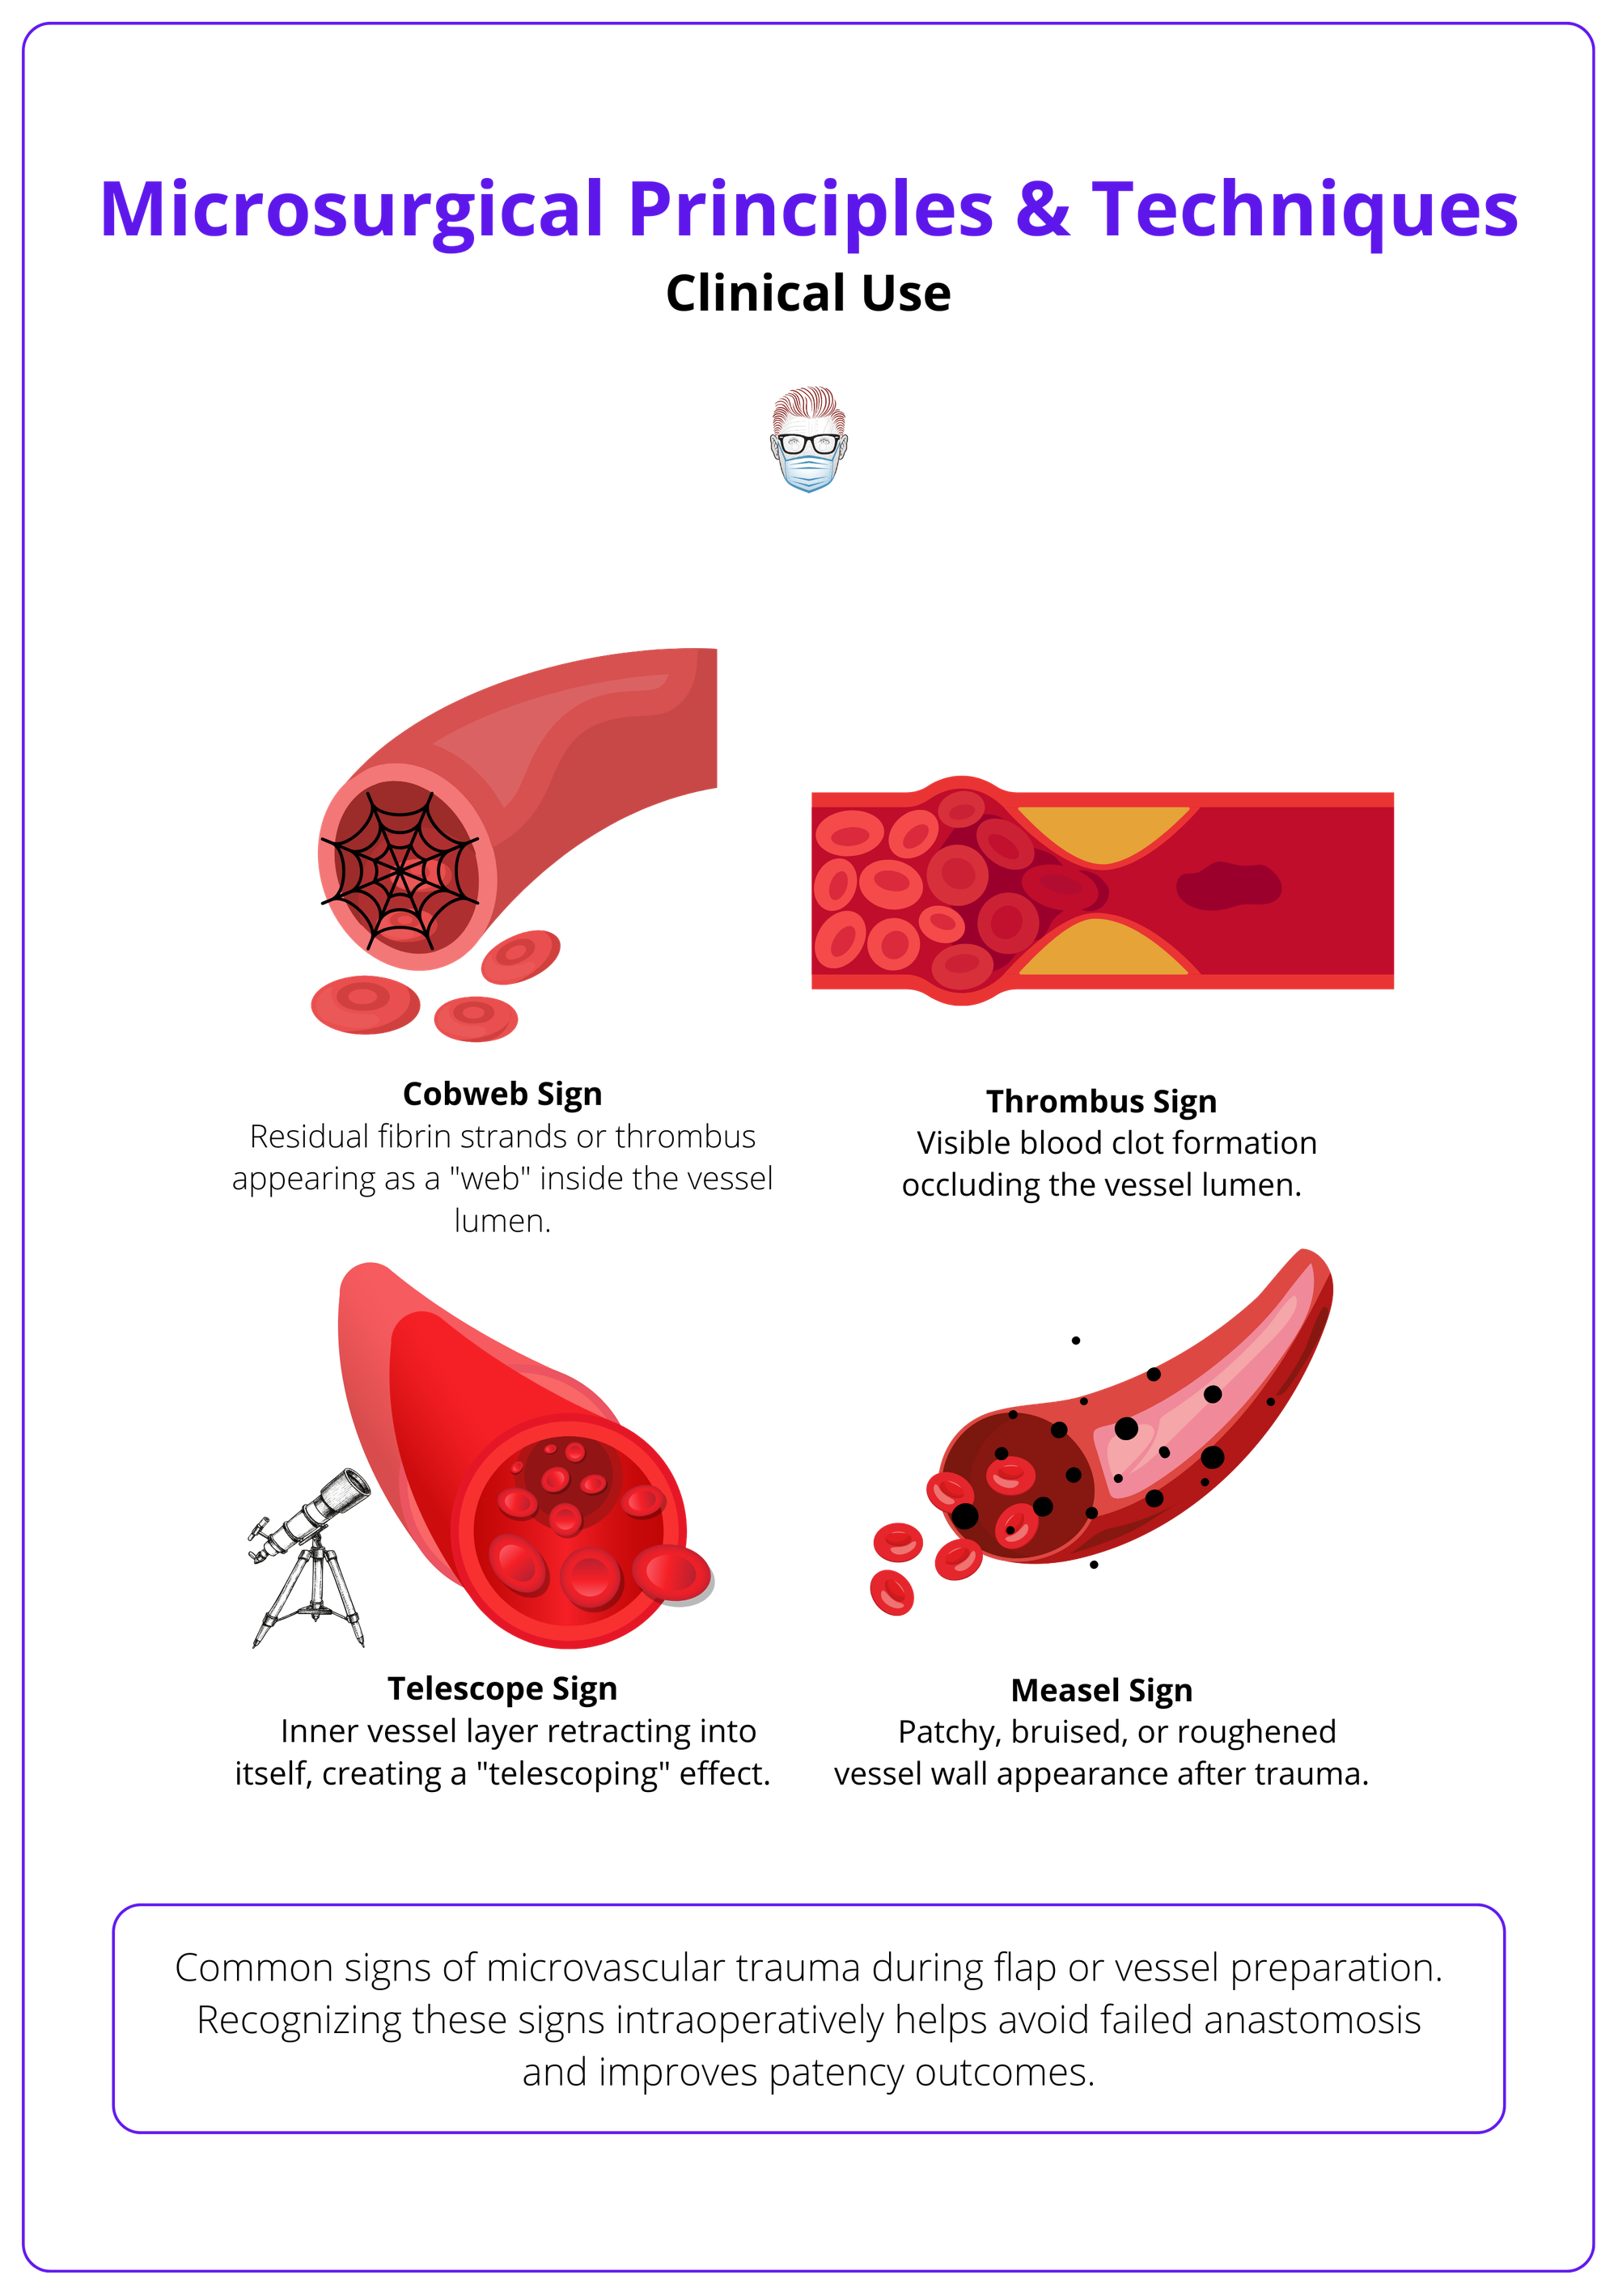
Microsurgery is indicated when local or regional options cannot achieve sufficient coverage, contour, or function. Common clinical scenarios include,
- Composite defects (e.g., mandibulectomy, open fractures).
- Extensive oncologic resections (e.g., head & neck, breast, sarcoma).
- Traumatic limb injuries requiring bone, nerve, or soft tissue reconstruction.
- Functional restoration (e.g., free functioning muscle transfers).
- Replantation of digits or limbs.
- Lymphedema management via supermicrosurgical lymphovenous anastomosis (Koshima, 2000).
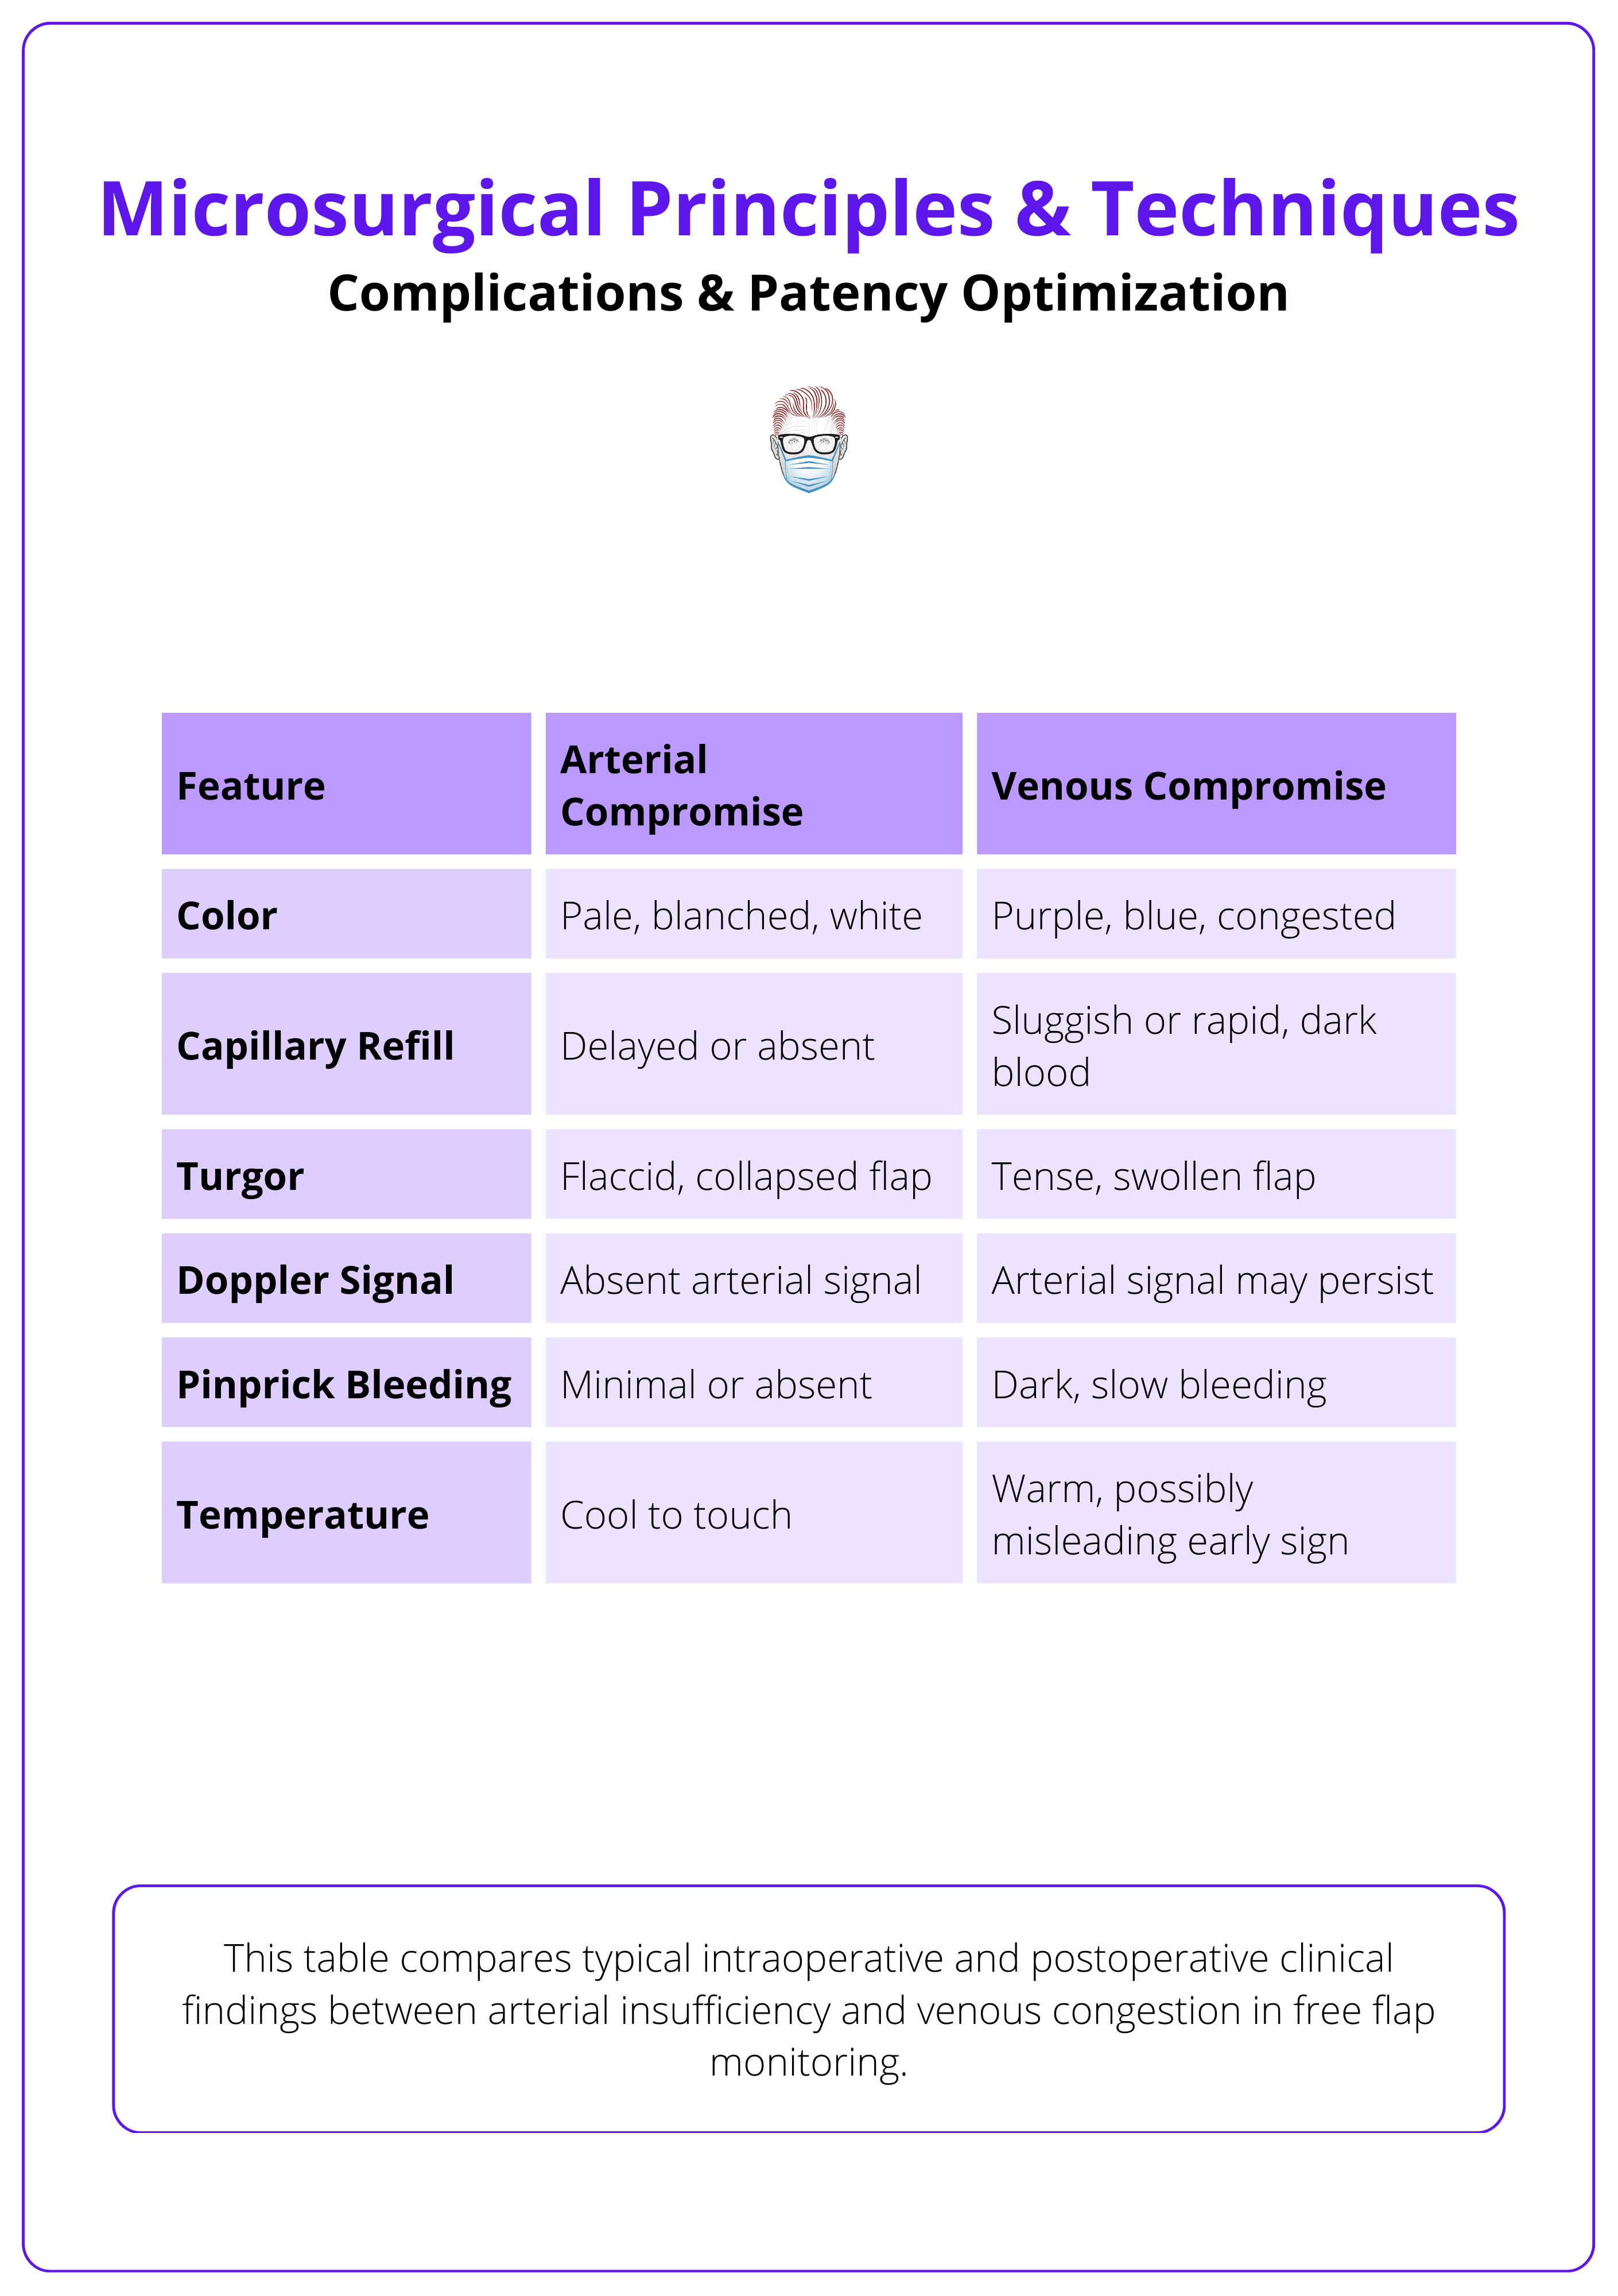
The image below illustrates signs of microvascular trauma.
Functional & Aesthetic Roles
Microsurgical techniques not only restore anatomical coverage but also provide,
- Functionality: Through nerve coaptation and dynamic muscle transfers.
- Aesthetic Matching: “Like with like” tissue replacement (e.g., DIEP flap in breast reconstruction).
- Structural Integrity: Using composite flaps that include skin, fat, fascia, muscle, and bone.
This makes microsurgery uniquely suited for regions where form and function are both critical, like the face, hand, and lower limb.
Contraindications and Patient Selection
There are no absolute contraindications to microsurgical reconstruction, but several factors demand caution.
- Systemic Health: Prolonged surgery requires a stable cardiac and pulmonary status.
- Smoking: Not an absolute contraindication, but associated with a 50% higher risk of wound complications; 90% failure rate in digital replantation.
- Hypercoagulable States: History of thromboembolism or miscarriage warrants screening.
- Age Extremes: Elderly and pediatric patients can still be suitable with appropriate optimization.
- Irradiated Tissue: Not a contraindication. Free flaps are often preferred for coverage over previously irradiated tissue.
Preoperative planning and multidisciplinary collaboration ensures safe case selection.
The classic “reconstructive ladder” has evolved into a “reconstructive elevator,” where microsurgery is now often the first choice for complex reconstructions — not the last resort.
Core Microsurgical Principles & Surgical Environment
Successful microsurgery depends as much on the setup and environment as the anastomosis itself; ergonomic posture, precise planning, and the right optical system minimise fatigue and maximise precision.
Microsurgery demands sustained precision and consistency. Outcomes are strongly influenced not only by the surgeon’s technique but also by the operative environment, ergonomics, and intraoperative planning. Even subtle factors such as posture or microscope placement can affect success.
Ergonomics and Surgeon Positioning
Microsurgical procedures demand hours of sustained precision. Poor posture leads to tremor, fatigue, and long-term musculoskeletal strain.
Ideal Positioning
- Seated with feet flat, knees/hips/elbows at 90°.
- Back straight and neck neutral.
- Forearms supported on armrests, towel stacks, or the patient’s body.
- Hands stable, ideally resting while suturing under magnification.
Planning and Operative Setup
A calm, structured environment is essential for microvascular success.
Preoperative planning includes,
- Marking donor and recipient vessels clearly.
- Avoiding IVs, A-lines, or BP cuffs in the donor limb (e.g., radial forearm flap).
- Pre-op discussion with anesthesia team to manage temperature, perfusion, and vasoactive drugs.
OR Setup Tips
- Microscope in optimal position before starting.
- Light blue or green background mats to contrast with vessels and sutures.
- Minimal OR traffic and vibration.
- Dedicated micro-instrument table, arranged by sequence of use.
Operating Microscope vs Loupes
Both are used in microsurgery and the choice depends on the task, magnification required, and surgeon comfort.
Microscope
- Standard for anastomosis.
- Binocular, 10x-40x magnification (usually 12.5x for anastomosis).
- Double-headed models allow assistant visualization.
- Advanced models may include ICG angiography for perfusion assessment.
Surgical Loupes
- 2.5x–4.5x magnification, often used for dissection and flap inset.
- Useful in vessel preparation, but limited depth of field at higher power.
- Portable and ergonomic, but less precise than a microscope for fine suturing.
Use loupes for macro tasks and the microscope for the microvascular anastomosis phase.
Instrumentation & Equipment
Microsurgical success depends on fine-tipped, atraumatic instruments, ultra-thin sutures, and adjunct tools like couplers and background mats that enhance precision and reduce operative time.
Microsurgical instruments are purpose-designed for delicate handling of vessels and nerves. Their use requires familiarity with fine motor control and visual alignment under magnification. Proper setup and organisation improve workflow and reduce the risk of technical errors.
Essential Microsurgical Tools
Microsurgical instruments are designed for minimal tissue trauma, maximal precision, and comfortable handling under magnification.
Forceps
- Jeweler’s forceps (No. 2–5): Fine, non-toothed, smooth-tipped.
- Adventitia forceps (e.g., Pearce): Fine teeth to grip the vessel sheath.
Scissors
- Curved microscissors for vessel dissection and adventitia trimming.
- Straight scissors for suture cutting.
Needle Holders
- Straight or curved, non-locking preferred.
- Some surgeons use jeweler’s forceps instead for better tactile feedback.
Vessel Dilators
- Smooth-tipped for gentle dilation to relieve vasospasm or correct size mismatch.
Clamps & Backgrounds
- Microvascular clamps: <30 g/mm² closing pressure to protect endothelium.
- MicroMat background sheets: Improve contrast (usually light blue/green).
- Elastic stay hooks: Retract tissue and improve field exposure.
Microstructure Types & Needles
Suture Material
- Monofilament nylon or polypropylene.
- Non-absorbable, low tissue reactivity.
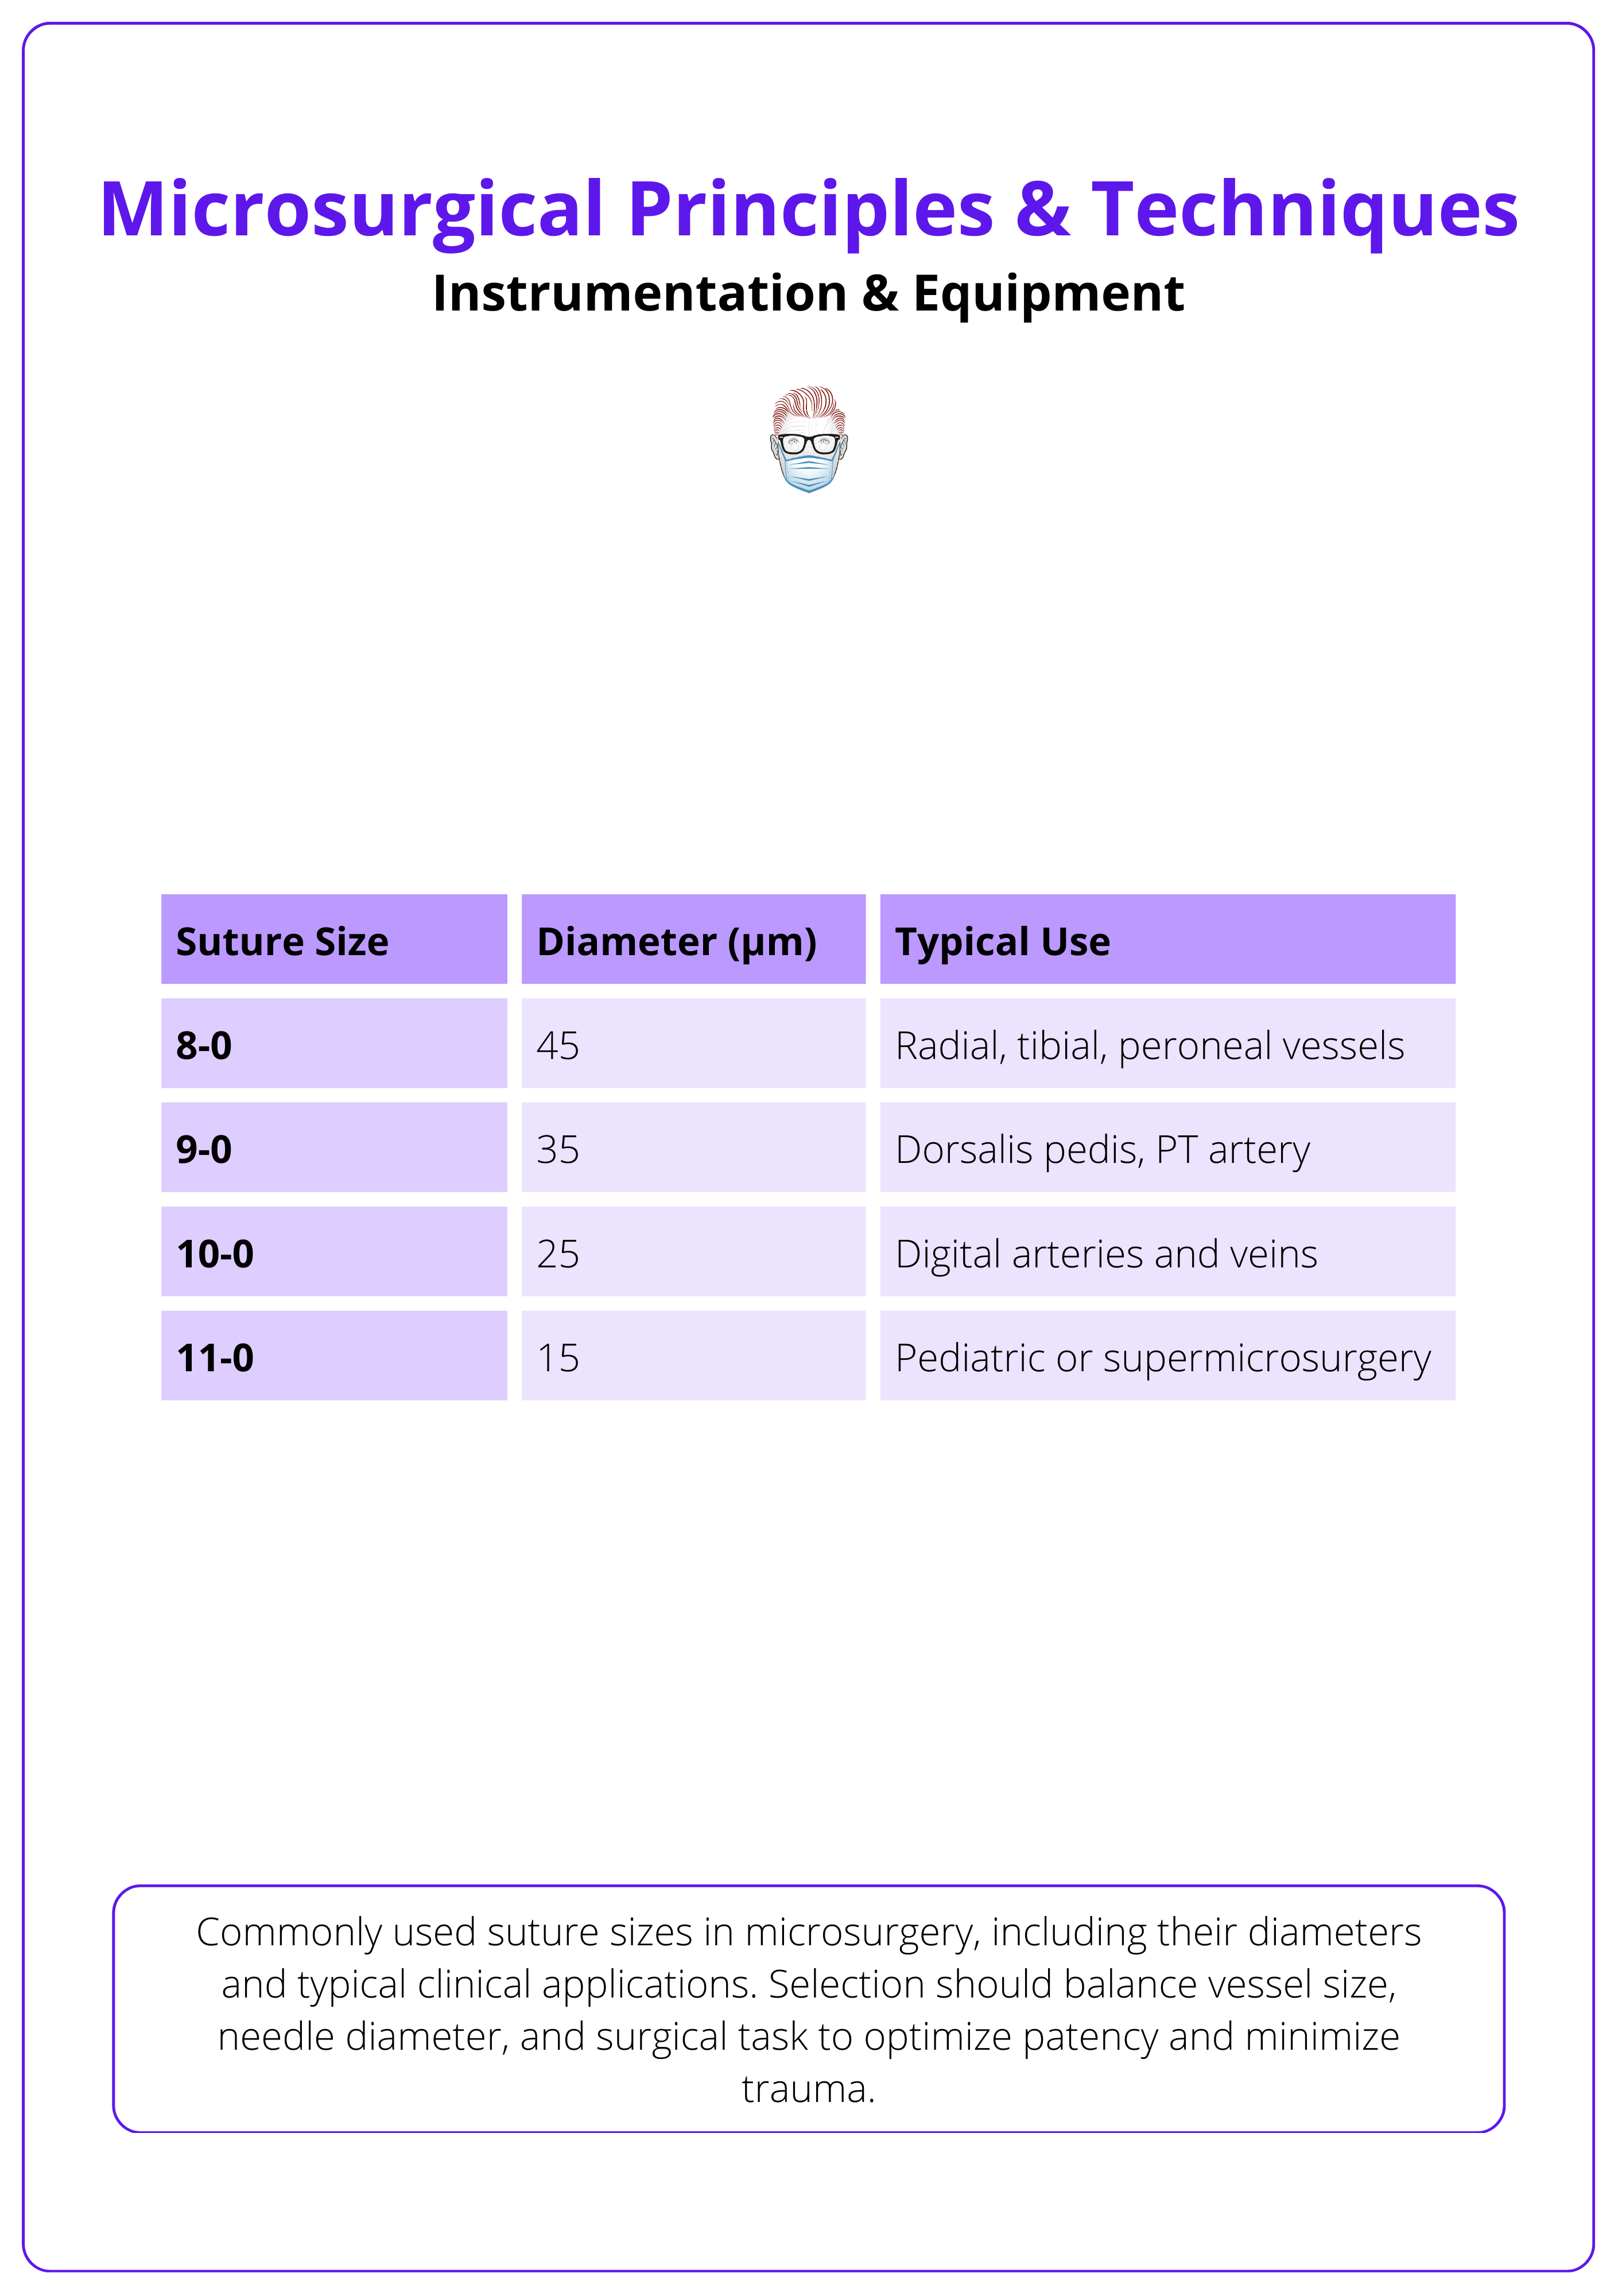
Suture Sizes
- Range from 8-0 to 11-0
- Choice depends on vessel size (smaller size for finer vessels)
Suture sizes, diameters, and common applications are summarised below.
Microneedle Design
- Three-eighths or half-circle curvature.
- Taper-point preferred for vascular work.
- Swaged (eyeless) with a diameter matched to suture size.
- Needle diameter determines hole size; larger needles can leak.
Microvascular Couplers & Adjunct Devices
Venous Couplers (e.g., GEM System)
- Sutureless, rigid ring system for end-to-end or end-to-side venous anastomoses.
- Sizes: 1.5–4.0 mm.
- Reduces ischemia time, minimal learning curve.
- <1% thrombosis rate in large series (Chang, 2011).
Other Adjuncts
- Bipolar Coagulation: Precise hemostasis >2 mm from vessel.
- ICG Angiography: Real-time flap perfusion assessment.
- Heparinized Saline & Papaverine: Prevent thrombosis and vasospasm.
- Bird Bath: Instrument rinse with heparin-soaked gauze.
Always verify that your microvascular clamps exert <30 g/mm² pressure to avoid crushing the endothelium.
Microvascular Technique
Success in microsurgery hinges on meticulous vessel preparation, selecting the correct anastomotic technique, and tailoring your suturing strategy to minimize flow disturbances and technical failure.
Microsurgical anastomosis is a stepwise, technically demanding process. Each component, including vessel preparation, orientation, and suture placement must be optimised to avoid thrombosis, leakage, or flap loss. Variations in technique accommodate size discrepancies and anatomical challenges.
Vessel Preparation
Proper preparation of both donor and recipient vessels is critical before any microanastomosis. Key steps include,
- Adventitia Trimming
- Removes obstructive connective tissue and reduces turbulence at the anastomosis. Use adventitia scissors or fine forceps.
- Do not strip too aggressively as it can damage the vasa vasorum and cause vasospasm.
- Lumen Inspection: Check for thrombi, plaques, or intimal flaps. Use heparinized saline to flush and irrigate.
- Dilation: Use vessel dilators or forceps to gently dilate the lumen and reduce vasospasm.
- Length Adjustment
- Ensure adequate vessel length without tension. Avoid sharp bends, twisting, or redundancy.
- A short, tense vessel is a common cause of flap failure due to kinking or anastomotic tension.
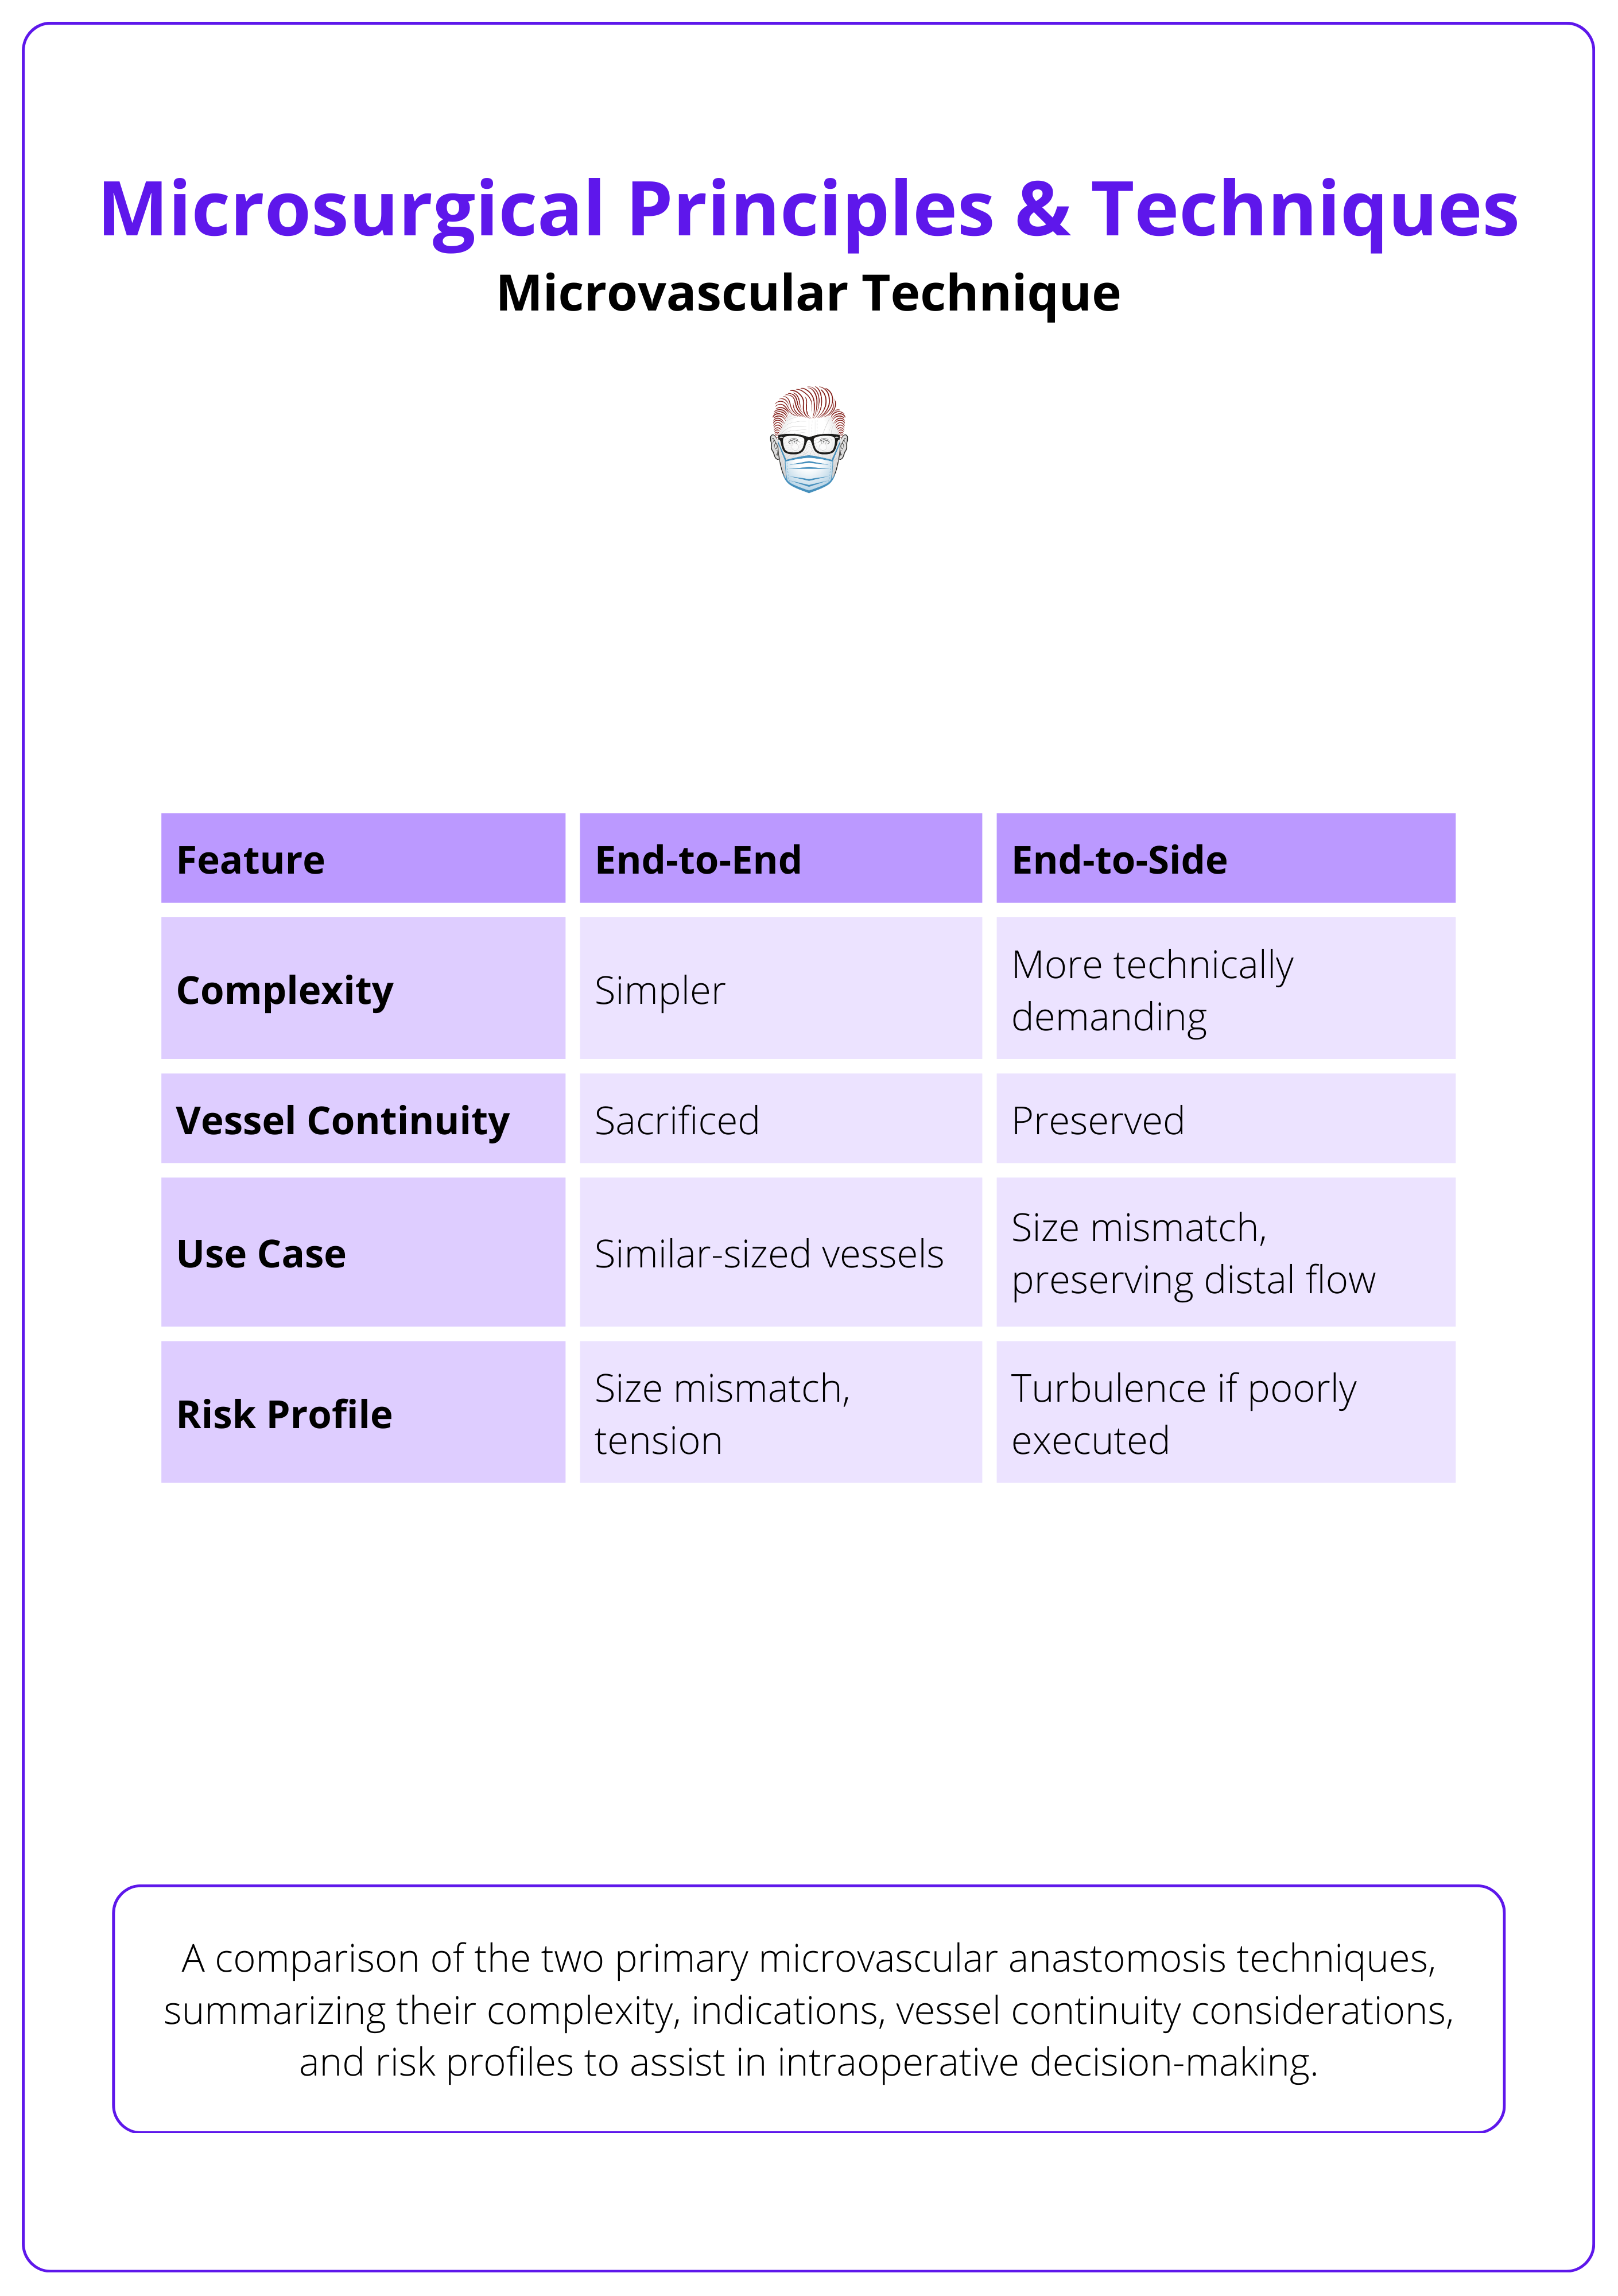
Anastomotic Techniques: End-to-End vs End-to-Side
End-to-End Anastomosis
- Most common technique in flap surgery and replantation.
- Simpler alignment, ideal for similar-caliber vessels.
- Interrupted sutures placed radially around the circumference.
- Stay sutures at 12 and 6 o’clock help maintain orientation.
- Pros: Simplicity, fast learning curve.
- Cons: Sacrifices vessel continuity; size mismatch increases leak/thrombosis risk.
End-to-Side Anastomosis
- Used when preserving distal flow is necessary or when vessel size mismatch exists.
- Involves making a slit or arteriotomy in the recipient vessel and attaching the donor vessel at an angle.
- Stay sutures placed at proximal and distal edges of the slit help center the donor lumen.
- Pros: Maintains distal perfusion; good for size discrepancy. Stay sutures placed at proximal and distal edges of the slit help center the donor lumen.
- Cons: Technically more demanding; increased risk of turbulence if not done precisely.
Comparison of end-to-end and end-to-side techniques is summarised below.
Suturing Strategies & Size Discrepancy Management
- Interrupted vs Continuous Sutures
- Interrupted (gold standard): Offers better control, leak management, and easier revision.
- Continuous: Faster and best for larger vessels with minimal mismatch.
- Open-loop Technique: A hybrid of continuous and interrupted, offers faster closure with improved visibility.
- Back-wall First vs Front-wall First
- Controversial. Most favor back-wall first to prevent catching the posterior wall during closure.
- Managing Size Discrepancy
- Spatulation: Lengthens smaller vessel lumen to match the larger.
- Fish-mouth Incision: Expands small vessel circumference.
- Oblique Cuts: Prevent step-offs.
- End-to-side or vein grafts if the difference is extreme.
Insert needles perpendicular to the vessel wall and exit smoothly to avoid creating internal flaps or intimal tearing.
Intraoperative & Postoperative Patency Testing
Intraoperative Techniques
- Milking Test: Compress the vessel, release. The vessel should refill.
- Empty & Refill Test: Drain vein and watch for refill with pulsation.
- Acland Test: Observe pulsation proximal/distal to clamps after suturing.
- Indocyanine Green (ICG) Angiography: Real-time flow visualization in high-risk cases.
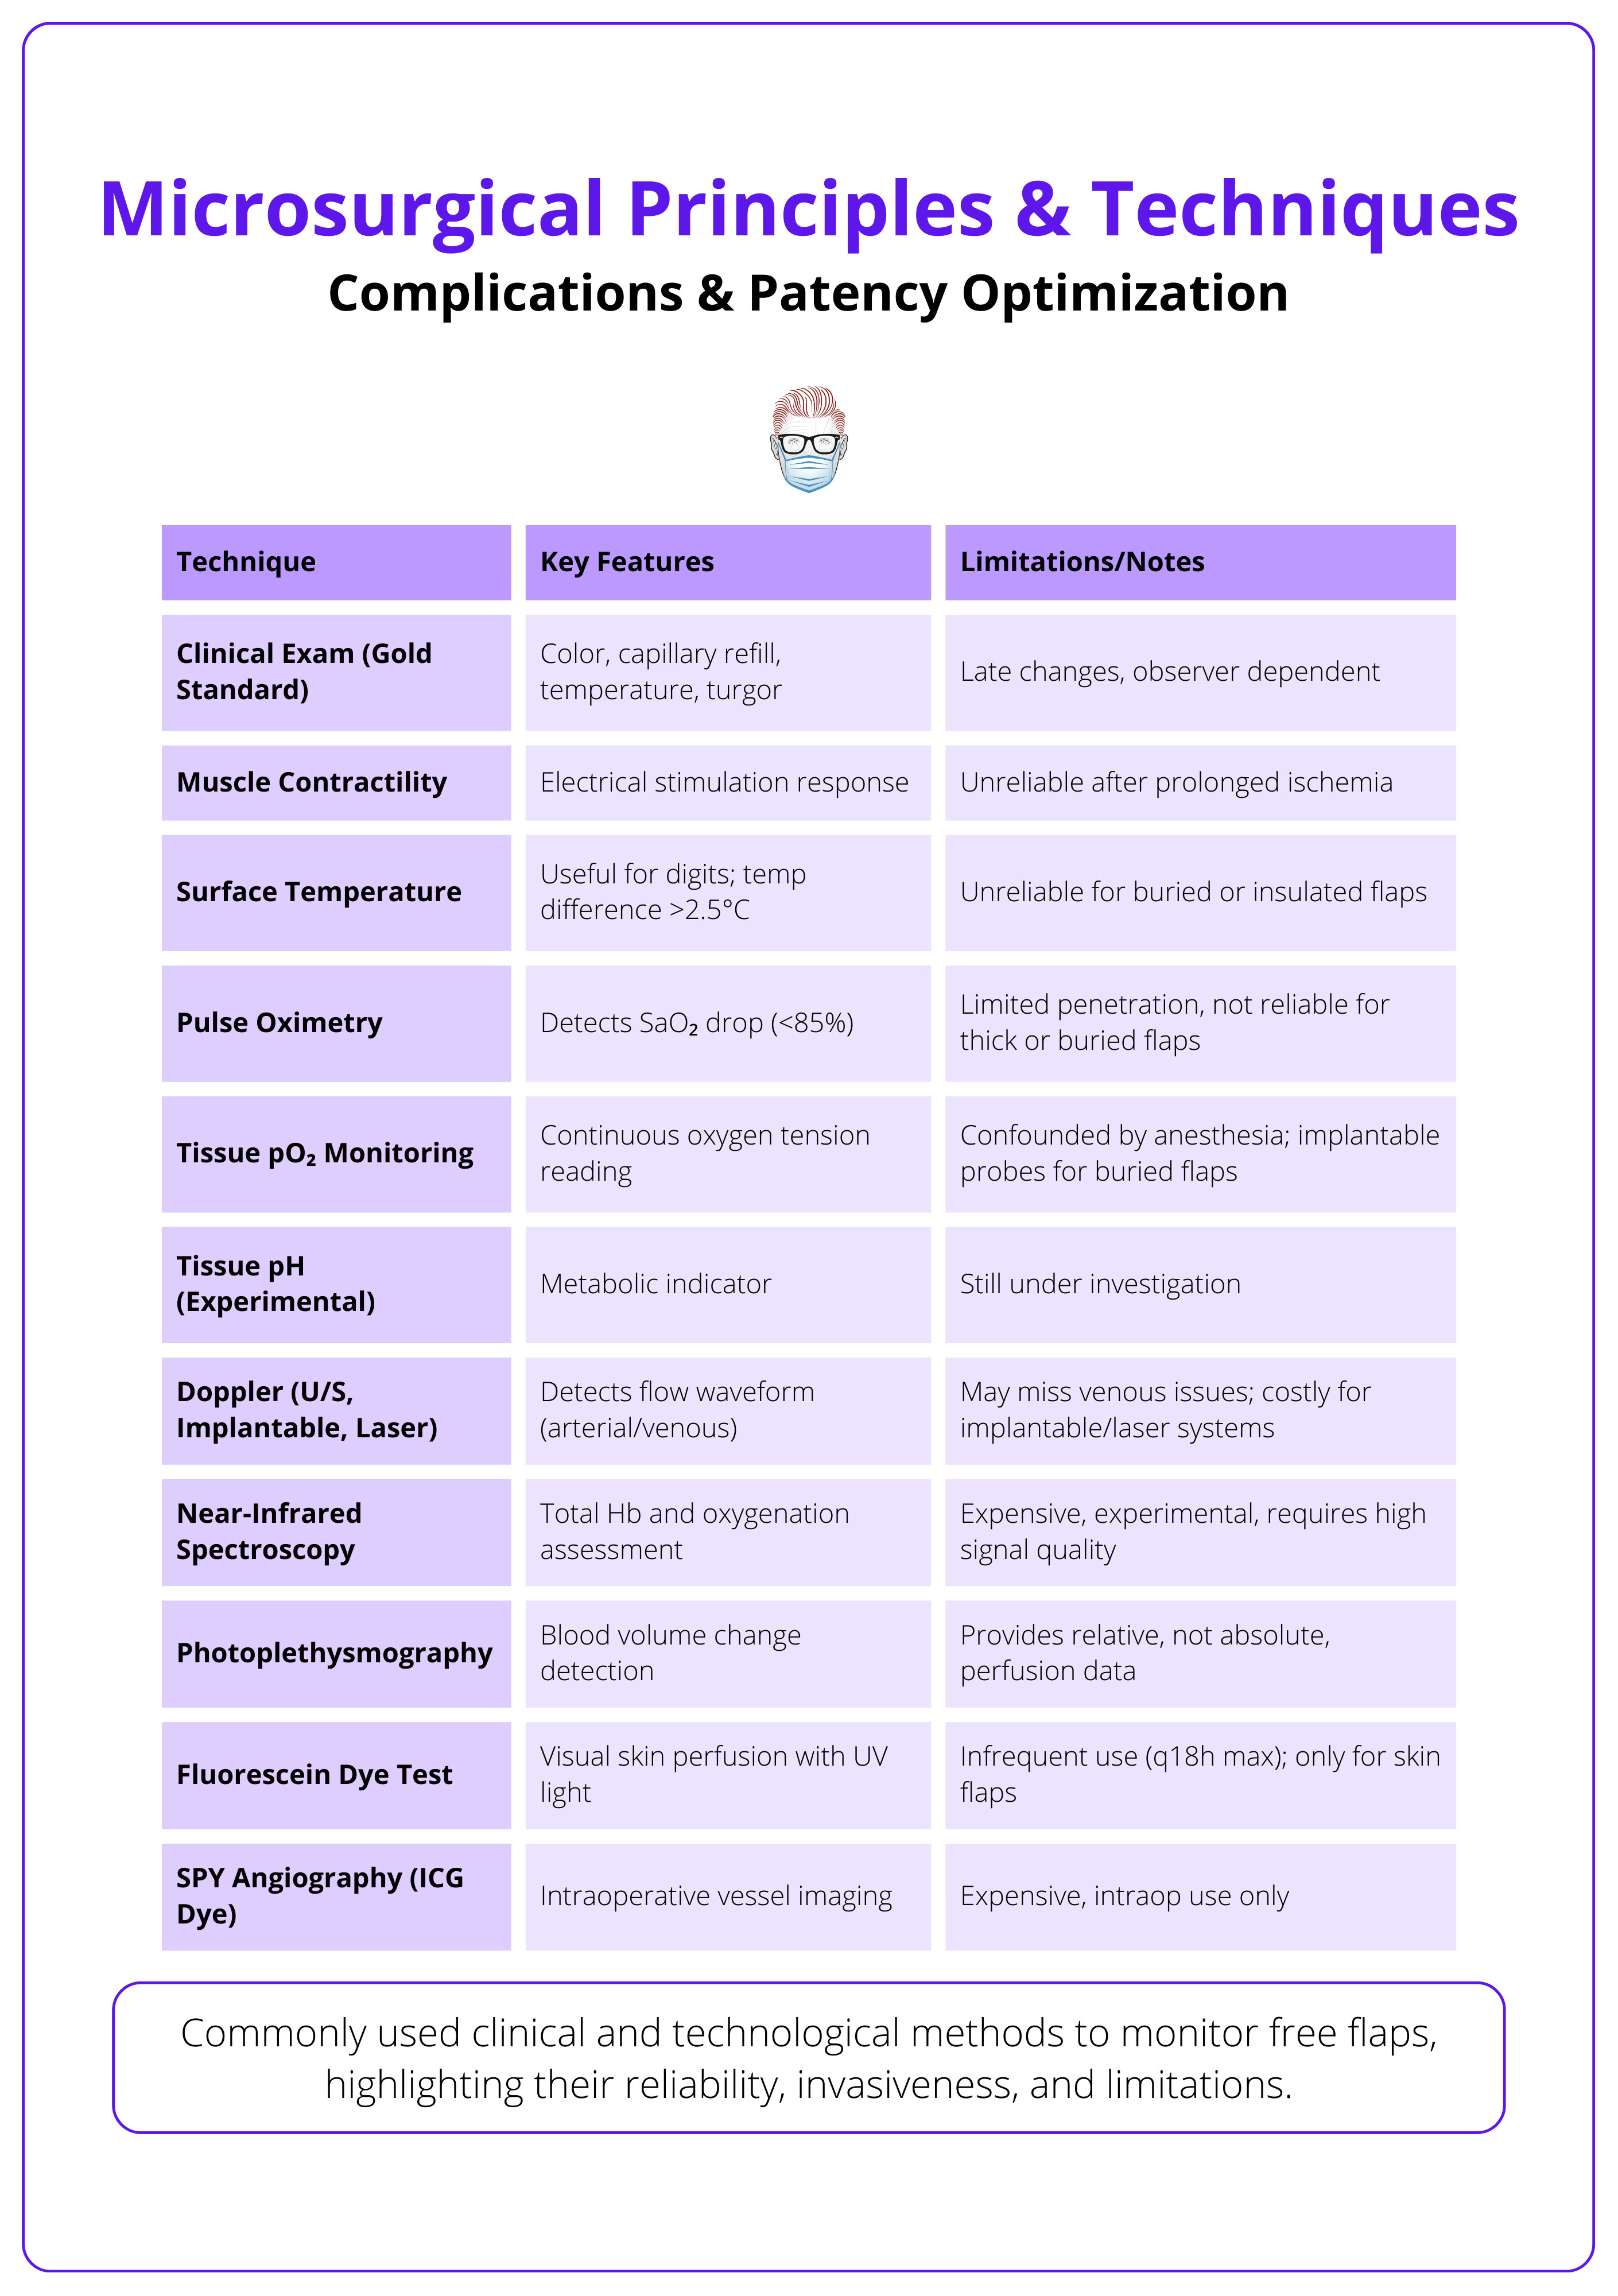
Postoperative Monitoring
- Clinical Parameters: Color, capillary refill, temperature, turgor, and bleeding on pinprick.
- Handheld Doppler: Most widely used tool, though prone to false positives.
- Implantable Doppler: Continuous flow monitoring; high sensitivity.
- Laser Doppler: Provides perfusion mapping, not routinely available.
Complications & Patency Optimisation
Flap failure in microsurgery is most commonly due to technical errors or thrombosis. A systematic approach to patency testing, flap monitoring, and early re-exploration can significantly improve outcomes.
While microsurgical success rates exceed 96-99%, complications, when they occur, it can lead to flap loss. Early recognition and prompt intervention are essential. This section outlines causes of failure, patency testing methods, and strategies for monitoring and salvage.
Causes of Flap Failure
Technical Causes
- Inaccurate suture placement (e.g., through back wall).
- Vessel twist, tension, or redundancy.
- Poor adventitia trimming or improper needle angle.
- Inadequate vessel length or inappropriate clamp positioning.
Systemic & Local Factors
- Hypotension, hypothermia, or vasospasm.
- Hematoma, external compression, or tight closure.
- Hypercoagulable states (e.g., Factor V Leiden).
Timing of Failure
- Early (within 48 hrs): Most commonly due to venous thrombosis.
- Late (>48 hrs): Often related to infection, poor recipient bed, or mechanical disruption.
Common technical, systemic, and local causes of microvascular compromise are summarised below.

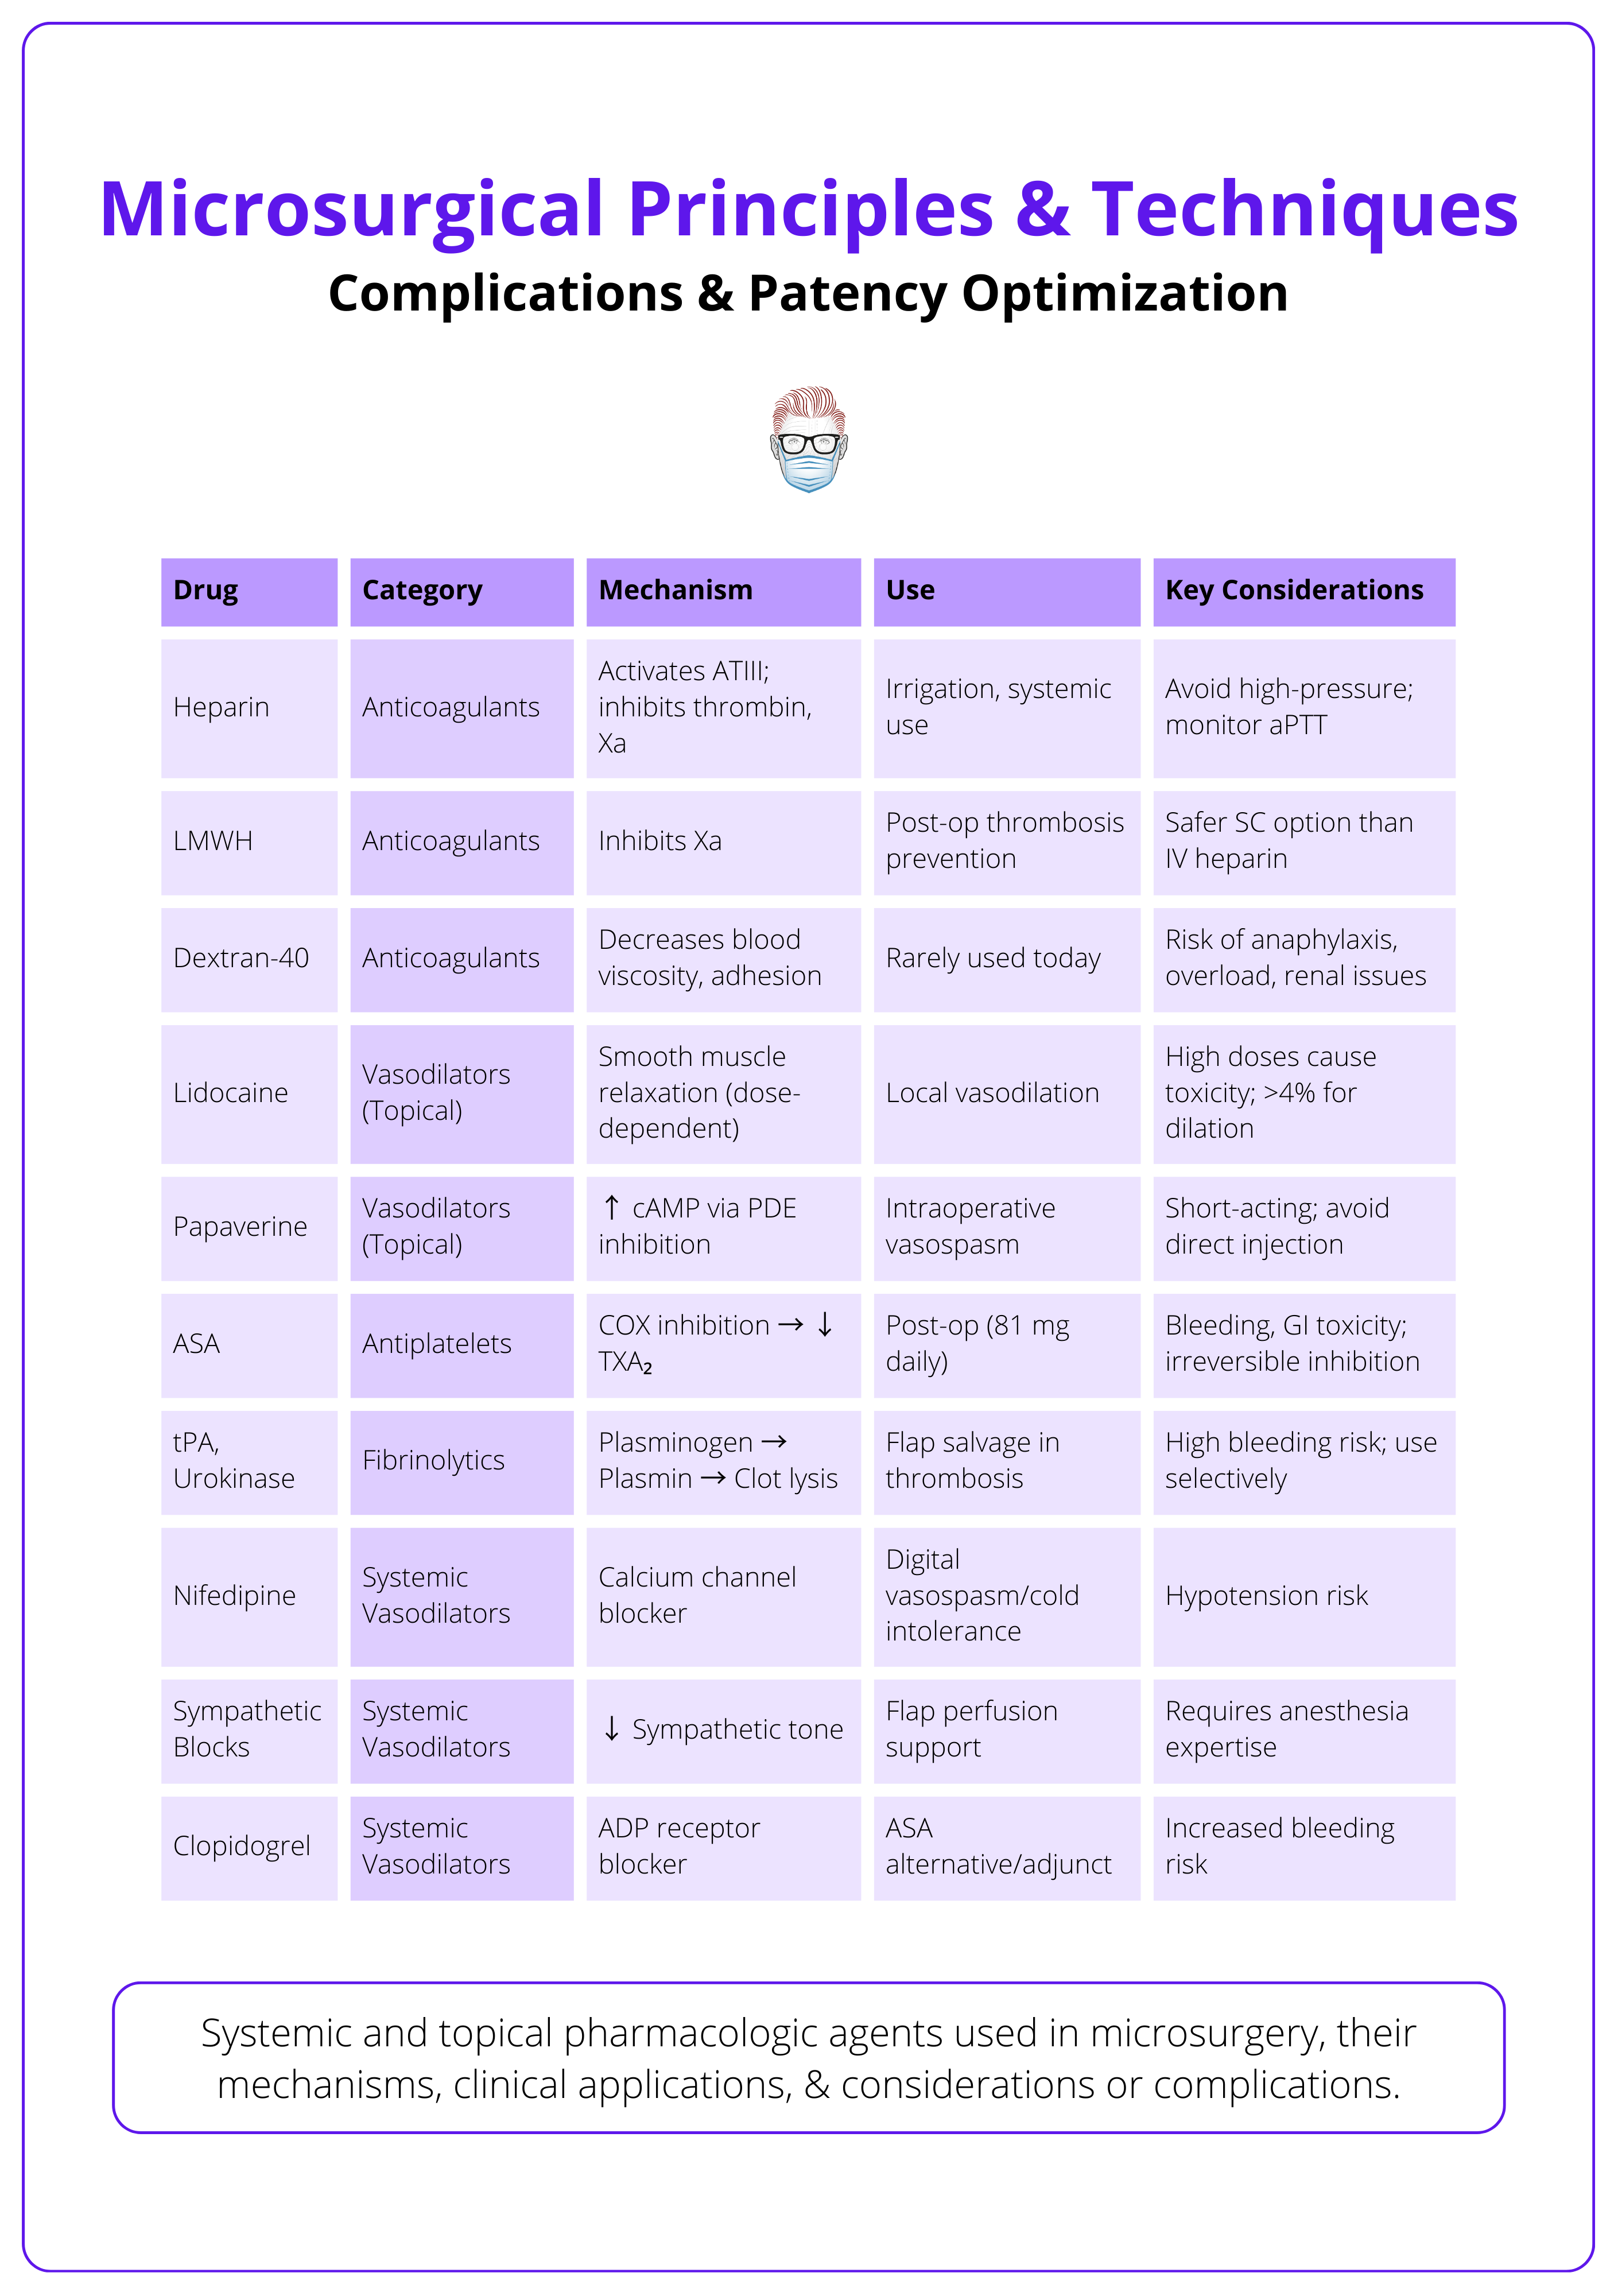
Anticoagulation, Flap Monitoring & Salvage Protocols
Anticoagulation Strategy
- Intraoperative: Flush with heparinized saline (100–500 U/mL).
- Postoperative: Low-dose aspirin or LMWH commonly used (varies by center).
- Avoid systemic heparin unless clotting disorders are suspected.
The key drugs used in microvascular surgery and their considerations are summarised below.
Flap Monitoring
- First 48 hours are critical. Perform hourly checks.
- High-risk flaps (e.g., perforators, replantations) may benefit from implantable Doppler or nurse-driven scoring systems.
Urgent re-exploration is required for sudden Doppler loss, skin changes, or absent pinprick bleeding, as flap salvage rates decline sharply after 6–8 hours of ischemia.
An overview of flap monitoring methods are summarised below.
Free flap success rates today exceed 96-99%, with most re-explorations occurring in the first 24 hours (Khouri, 1998).
Conclusion
1. Overview: Microsurgery enables precise repair of vessels and nerves ≤2 mm using magnification and fine instruments. It underpins major reconstructive advances including free flaps, nerve coaptation, replantation, and lymphatic surgery.
2. Clinical Use: Microsurgery is indicated for complex reconstructions following trauma, cancer resection, or congenital defects. It provides functional and aesthetic restoration, and is often a first-line approach.
3. Surgical Setup: Success depends on a structured operative environment, proper posture, and optimized magnification. Loupes are useful for dissection, while microscopes are essential for fine suturing and anastomosis.
4. Instrumentation: Microsurgical tools include fine-tipped forceps, non-locking needle holders, and vessel dilators. Sutures range from 8-0 to 11-0, with adjuncts like couplers, background mats, and ICG angiography enhancing precision.
5. Technique: Vessel preparation is critical, involving adventitia trimming, dilation, & length optimization. End-to-end is standard; end-to-side helps in size mismatch. Interrupted sutures remain the gold standard for patency.
6. Monitoring & Complications: Flap monitoring includes clinical exam, Doppler, and ICG. Most failures occur early due to venous thrombosis; re-exploration within 6–8 hours maximizes salvage.
Further Reading
- Wei FC, Mardini S. Flaps and Reconstructive Surgery. 2nd ed. Elsevier; 2016.
- Neligan PC, Song DH, eds. Plastic Surgery: Volume 5 - Principles. 4th ed. Elsevier; 2018.
- Buncke HJ, ed. Microsurgery: Transplantation and Replantation. Lea & Febiger; 1991.
- Koshima I, Inagawa K, Urushibara K, Moriguchi T. Supermicrosurgical lymphaticovenular anastomosis for the treatment of lymphedema in the upper extremities. J Reconstr Microsurg. 2000;16(6):437-442. doi:10.1055/s-2006-947150
- Khouri RK, Cooley BC, Kunselman AR, et al. A prospective study of microvascular free-flap surgery and outcome. Plast Reconstr Surg. 1998;102(3):711-721. doi:10.1097/00006534-199809030-00012
- Chang EI, Mehrara BJ, Festekjian JH, Da Lio AL, Crisera CA. Vascular complications and microvascular free flap salvage: the role of thrombolytic agents. Plast Reconstr Surg. 2013;132(4):795-803. doi:10.1097/PRS.0b013e31829f4c76
- Acland RD. ACLAND’s Video Atlas of Human Anatomy: Microsurgical Techniques. Wolters Kluwer; 2020.
- American Society for Reconstructive Microsurgery. ASRM Core Curriculum Modules. ASRM; 2023. Accessed March 4, 2025. https://www.microsurg.org/education/core-curriculum
- Kappen, I., Cornelissen, A., Shan-Qiu, S. (2024). Fundamentals of Microsurgery. In: De-Luna-Gallardo, D., Marquez-Espriella, C., Cienfuegos-Monroy, R. (eds) Plastic and Reconstructive Surgery Fundamentals. Springer, Cham. https://doi.org/10.1007/978-3-031-61894-9_125
- Villavisanis DF, Zhang D, Shay PL, Taub PJ, Venkatramani H, Melamed E. Assisting in Microsurgery: Operative and Technical Considerations. J Hand Surg Glob Online. 2023;5(3):358-362. Published 2023 Apr 4. doi:10.1016/j.jhsg.2023.01.011
