

Summary Card
Overview
Surgical instruments act as precise extensions of the surgeon’s hands. Mastery of instrument names, functions, and safe handling improves operative flow and patient outcomes while minimizing tissue trauma.
Scalpels & Handles
Blades vary in shape and application: No. 10 is suited for broad skin incisions; No. 11 for sharp punctures; and No. 15 for fine, precise skin work. Matching the blade to the task ensures clean cuts and protects tissue.
Forceps
Choose toothed forceps for sturdy tissues and atraumatic forceps for delicate structures; when unsure, err on the side of non‑toothed to reduce crush injury.
Retractors
Retractors provide exposure by gently holding tissues aside; choose the smallest retractor that affords a clear field to minimize tissue ischemia and pressure injury.
Scissors
Use the right scissors for the right task: fine scissors for delicate dissection and heavier scissors for cutting sutures. Never use dissecting scissors to cut sutures, as this dulls their blades.
Electrosurgery
Electrosurgery uses high‑frequency current to cut and coagulate tissue; monopolar circuits return current through a dispersive pad, whereas bipolar circuits confine current between two tips, limiting collateral damage.
Instrument Safety, Sterility, & Sharps Handling
Maintaining sterility and preventing sharps injuries depends on proper handling, instrument counts, and clear communication. Use hands‑free techniques and checklists to protect both patients and staff.
Specialized Instruments
Plastic surgery employs specialized tools, such as dermatomes for skin grafts and microsurgical instruments for vessel and nerve repair to achieve precise and aesthetic outcomes.
Instrument Sets by Phase
Preassembling instrument sets for each phase of surgery improves efficiency and ensures critical tools are available when needed.
Verified by thePlasticsFella ✅
Overview of Surgical Instruments
Surgical instruments act as precise extensions of the surgeon’s hands. Mastery of instrument names, functions, and safe handling improves operative flow and patient outcomes while minimizing tissue trauma.
An operation proceeds in phases: preparation, incision, exploration, dissection, and closure. Each phase calls for specific tools. Good communication with the scrub team and adherence to safety protocols, such as the WHO Surgical Safety Checklist, prevent errors and protect both patient and staff.
Surgical instruments by operative step are summarised below.
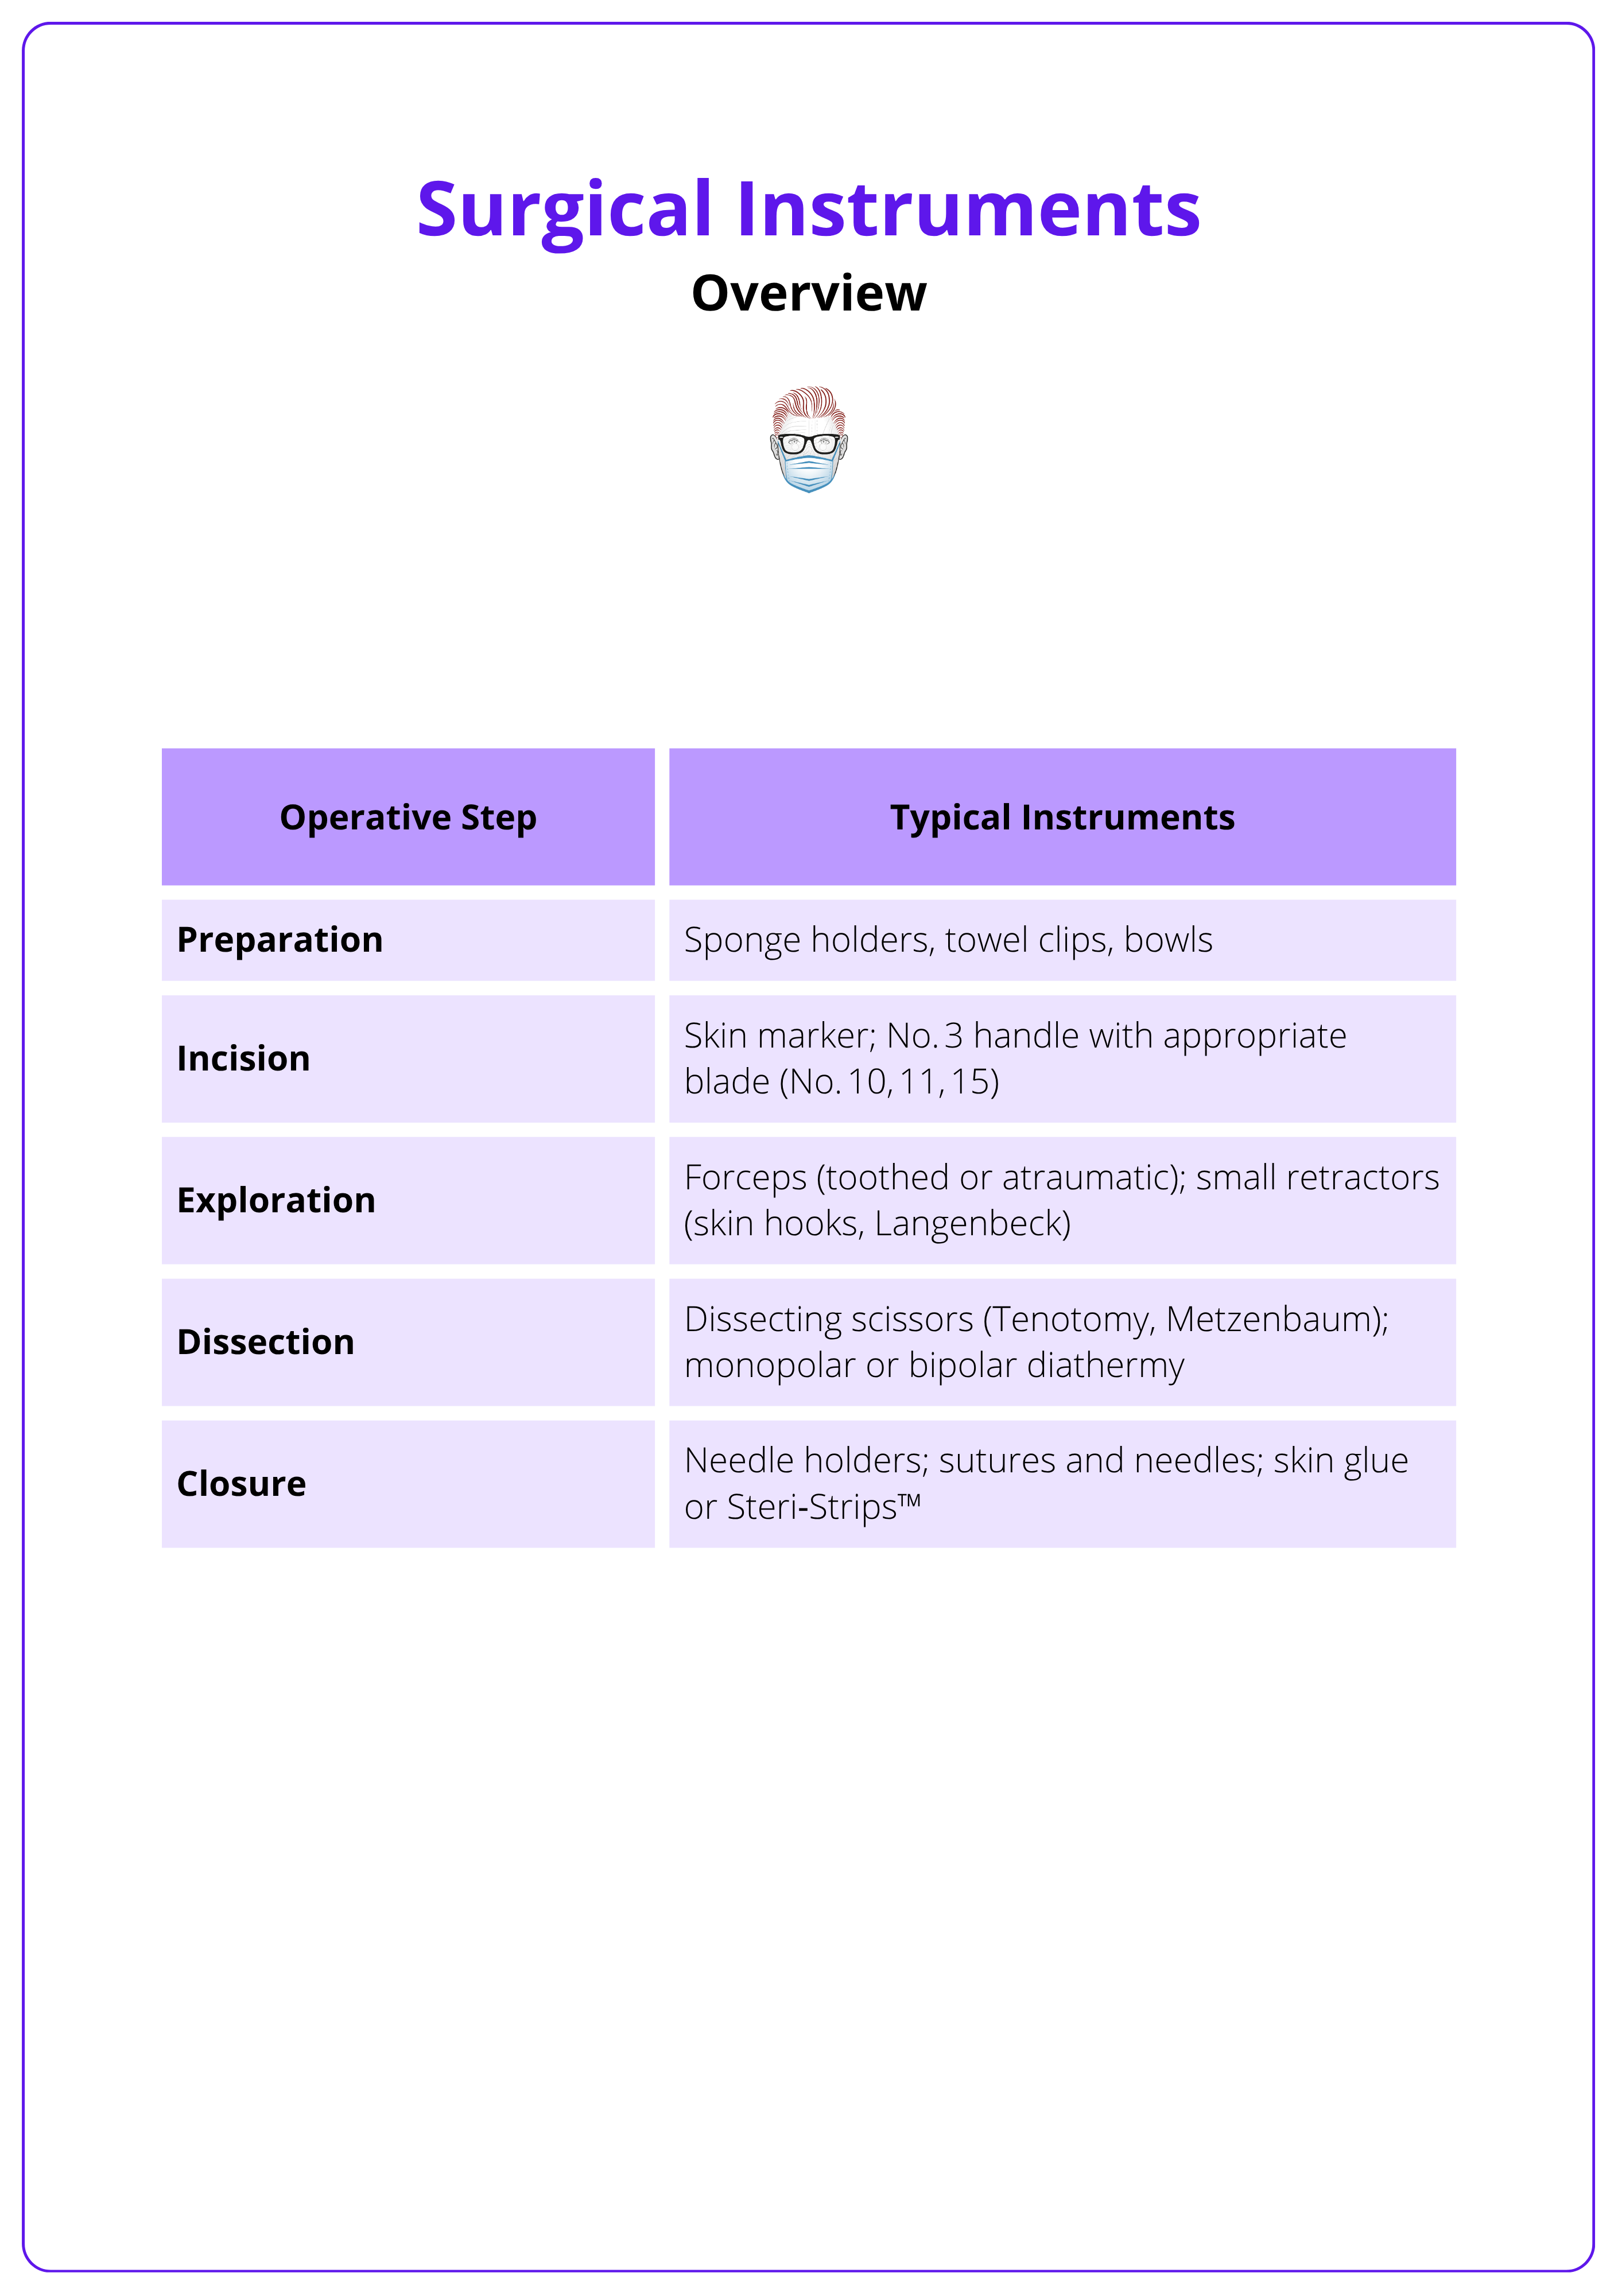
Before making the first incision, pause for a time‑out to review the surgical plan, check instrument counts and confirm that all necessary tools are available.
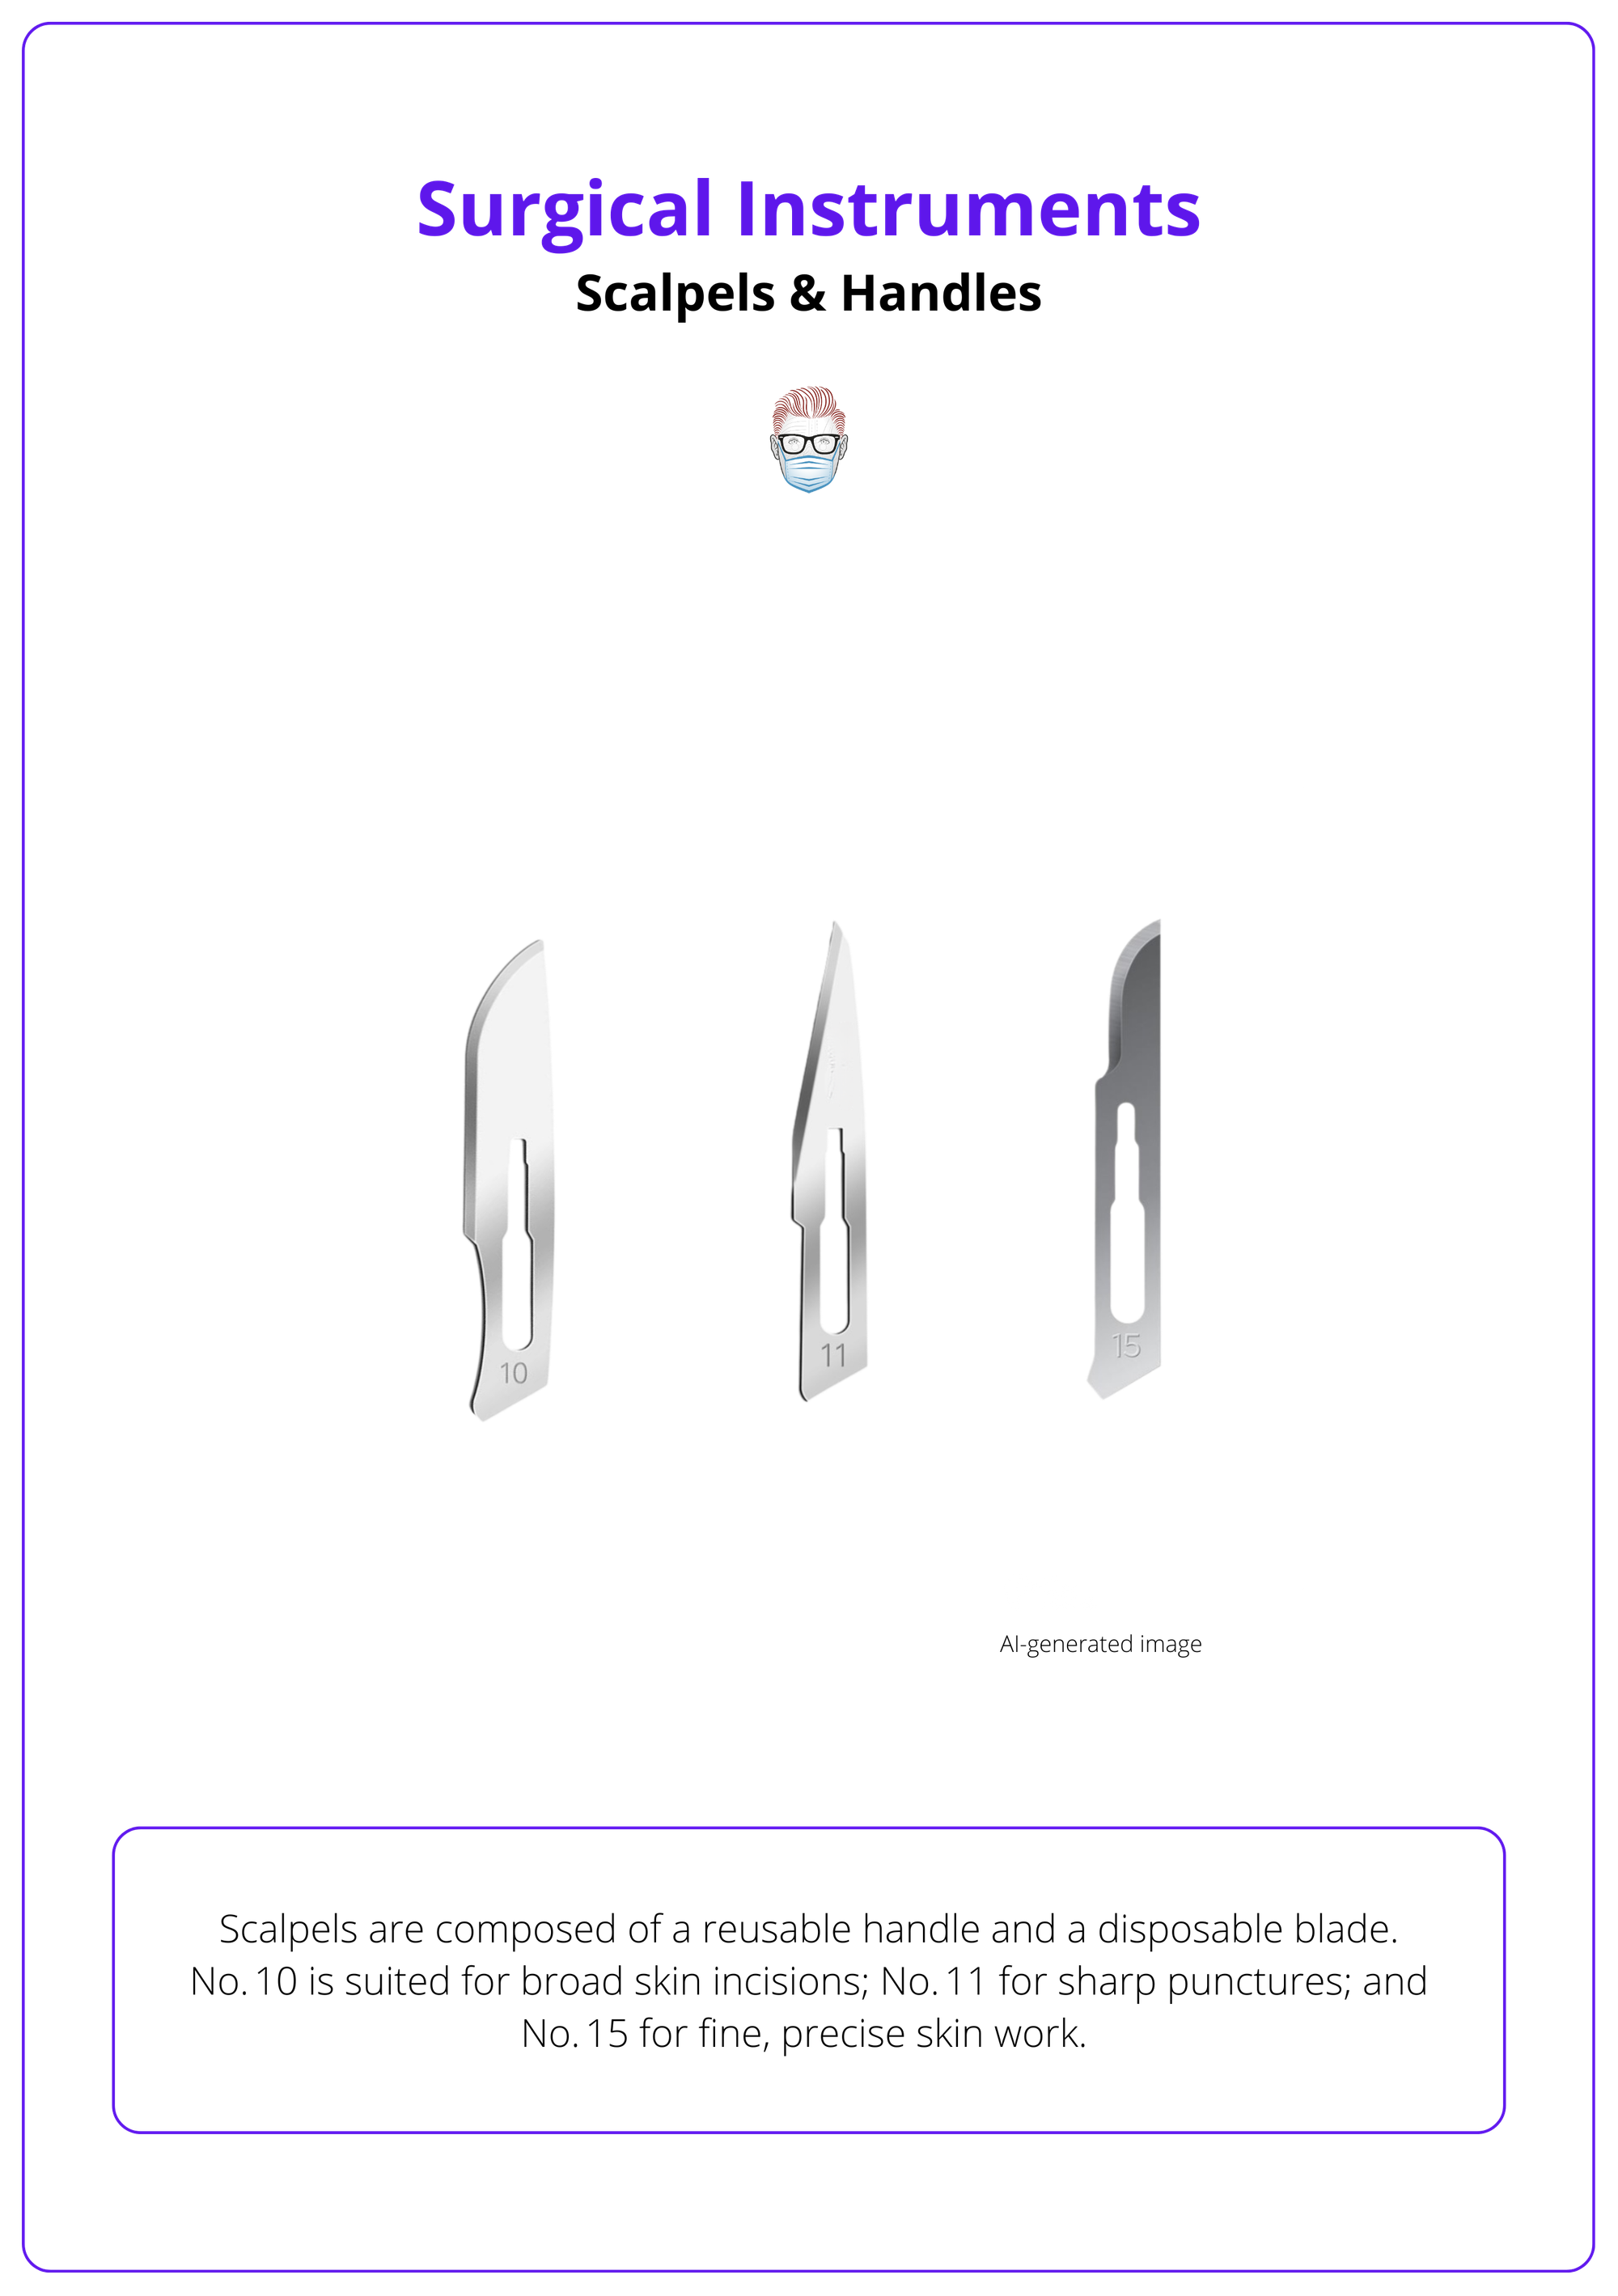
Scalpels & Handles
Blades vary in shape and application: No. 10 is suited for broad skin incisions; No. 11 for sharp punctures; and No. 15 for fine, precise skin work. Matching the blade to the task ensures clean cuts and protects tissue.
Scalpels are composed of a reusable handle and a disposable blade. In plastic surgery, the No. 3 Bard‑Parker handle accommodates blades No. 10, 11, and 15. The No. 10 blade has a wide, curved cutting edge and is used to make long skin incisions or raise full‑thickness skin grafts. The No. 11 blade is triangular with a sharp point, suitable for stab incisions such as drain insertion or creating liposuction ports. The No. 15 blade has a small, curved cutting edge; it is the work‑horse for precise skin incisions in facial and hand surgery.
Common Pairings
- No. 3 handle + No. 15 blade: Used for delicate skin incisions on the face and hands.
- No. 3 handle + No. 10 blade: Used to harvest full‑thickness skin grafts or make long incisions.
- No. 3 handle + No. 11 blade: Used for small puncture wounds and drain or port insertion.
Always mount and remove blades with an artery forceps (never with fingers) to avoid sharps injury and maintain sterility. Dispose of used blades immediately in a sharps container. Establish a neutral zone on the mayo stand or a magnetic pad to pass scalpel handles without hand‑to‑hand contact.
Scalpels are illustrated below.
Use a neutral zone for passing scalpels and other sharps; place the instrument in the zone and verbally announce its placement to keep the entire team aware.
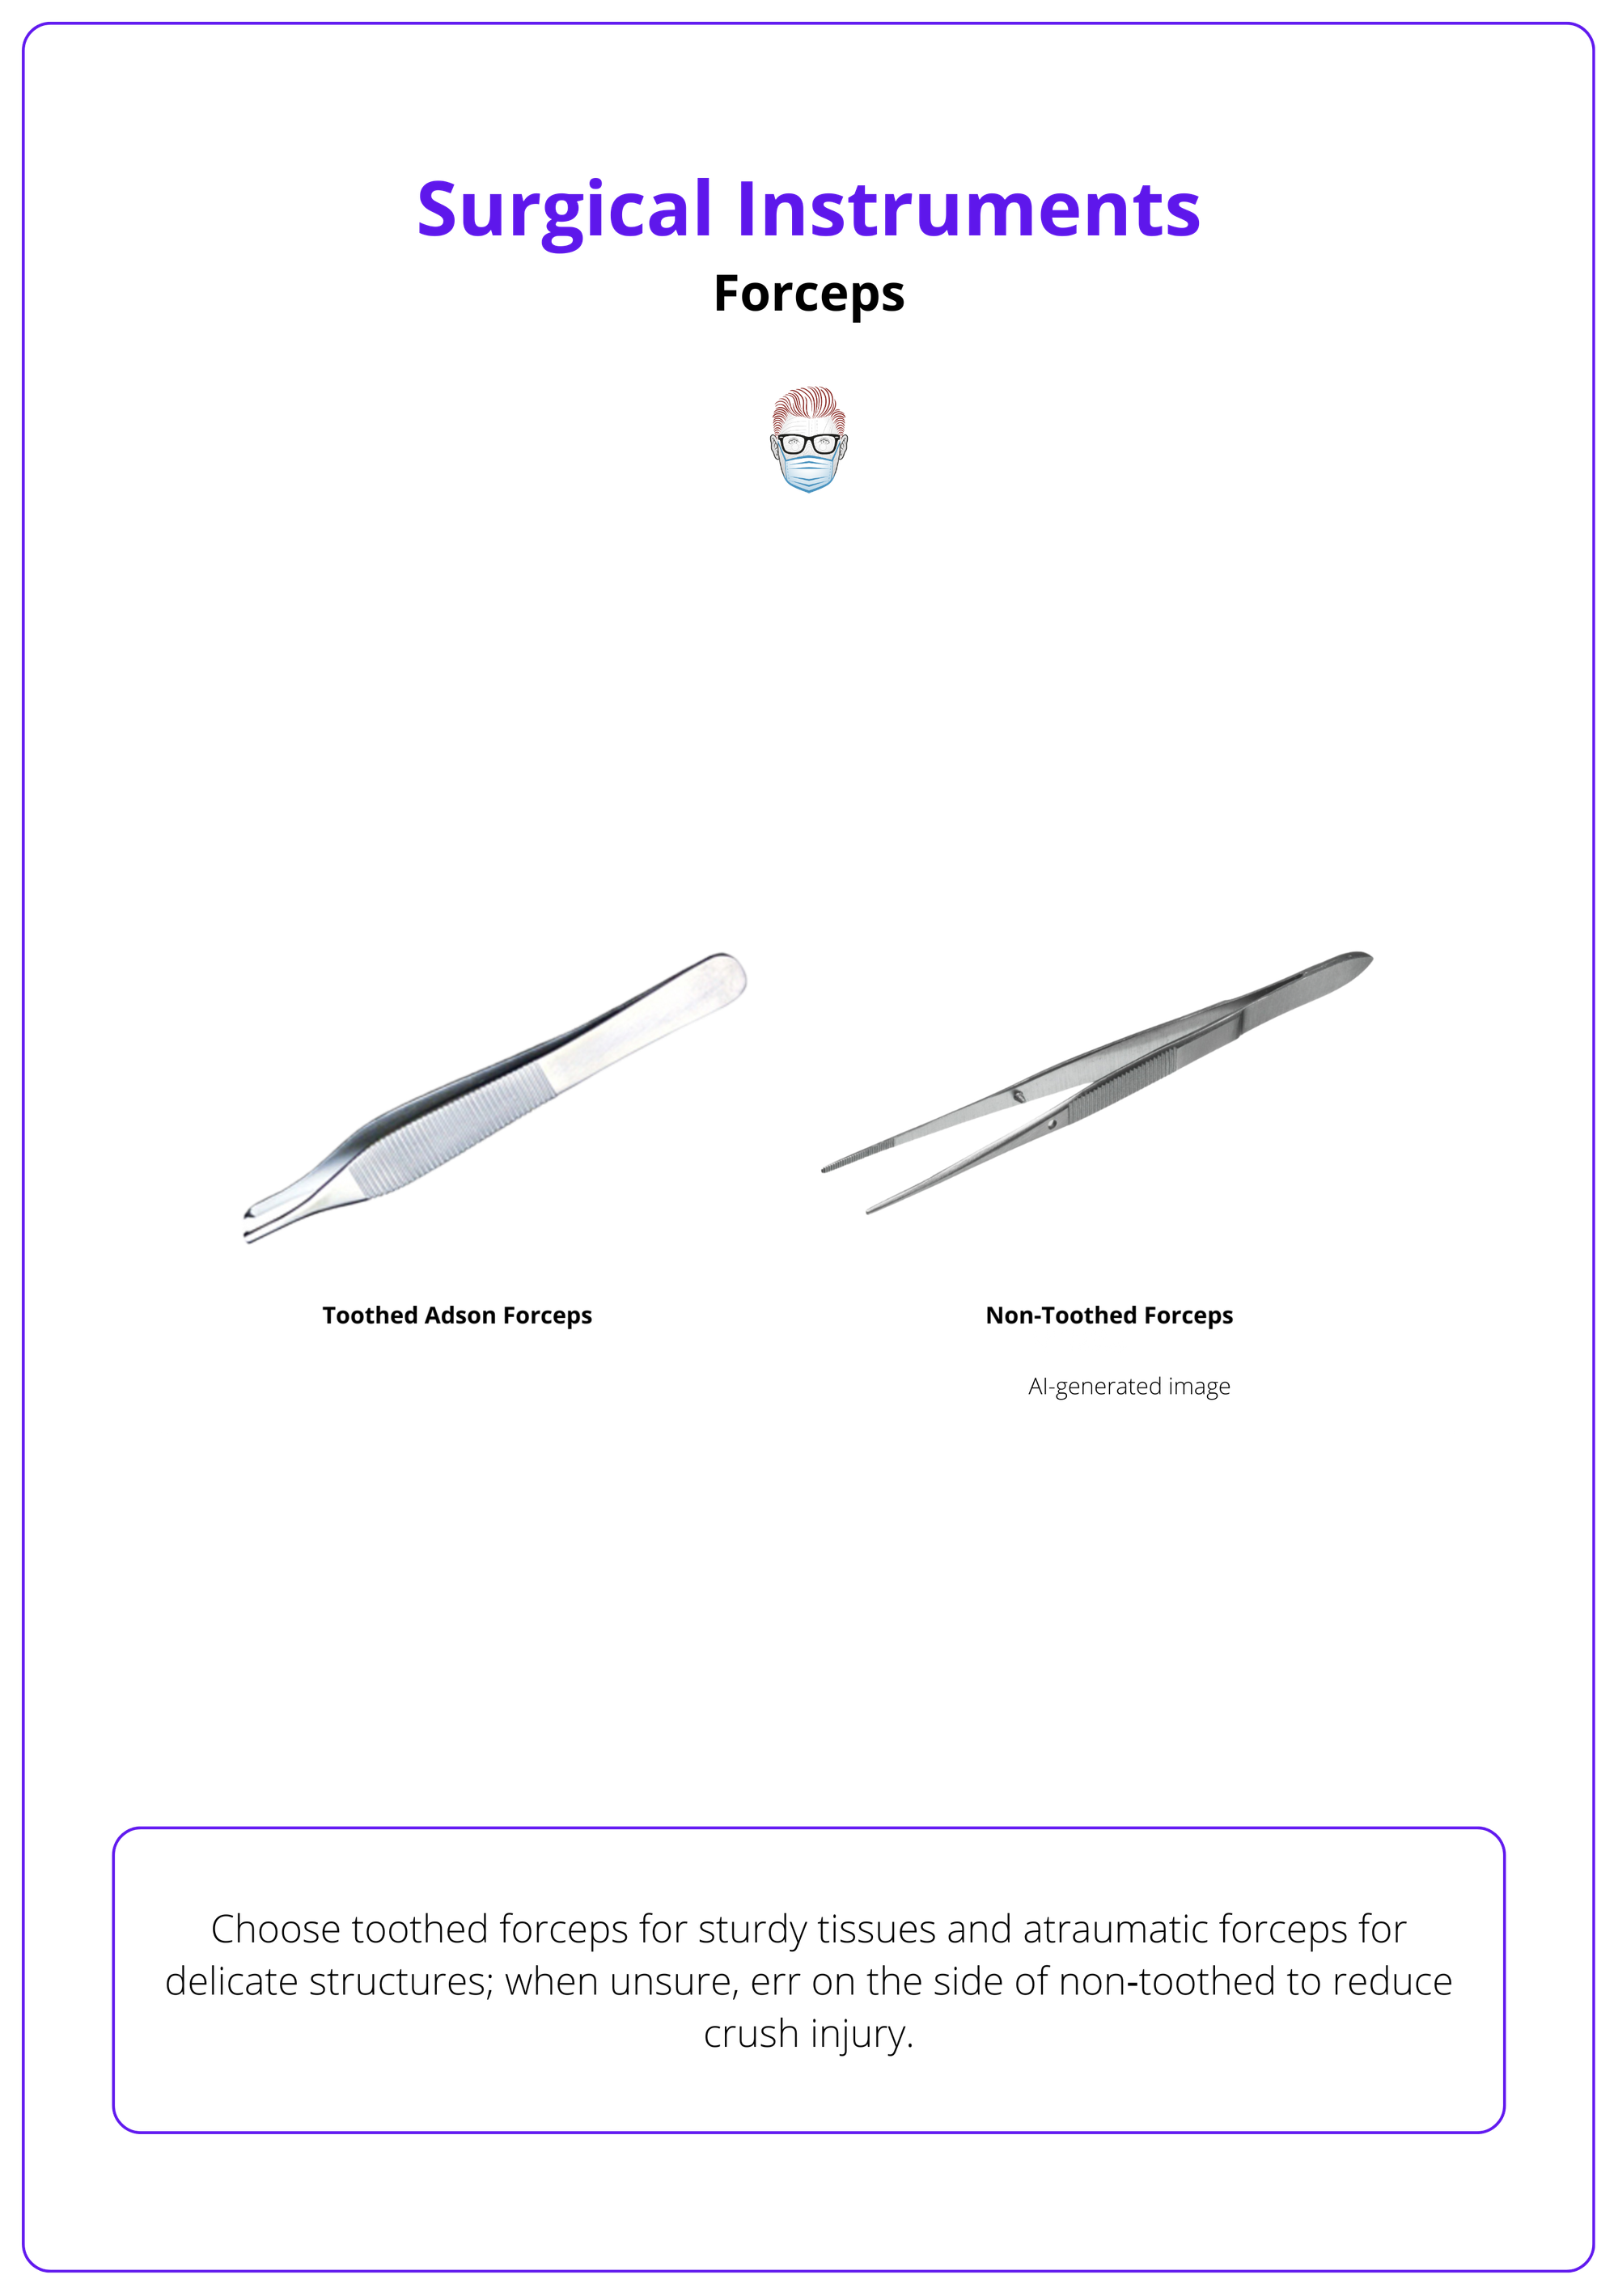
Forceps
Choose toothed forceps for sturdy tissues and atraumatic forceps for delicate structures; when unsure, err on the side of non‑toothed to reduce crush injury.
Forceps are used to grip, hold, or manipulate tissues. Toothed forceps, such as Adson forceps, have interdigitating teeth that provide secure purchase on skin, fascia, or muscle. They are invaluable when approximating dermal edges during closure or lifting thick fascia. Atraumatic forceps, such as DeBakey forceps, feature fine longitudinal serrations and are designed for delicate tissues like vessels, nerves, and skin grafts. A variation for microsurgery is the jeweler’s forceps, which has extremely fine tips for nerve and vessel work.
Adson (toothed) Forceps
- Features: Interdigitating 1×2 teeth, providing a strong grip.
- Typical Use: Handling skin, fascia, and muscle edges.
DeBakey (atraumatic) Forceps
- Features: Fine serrations and a narrow profile for gentle handling.
- Typical Use: Manipulation of blood vessels, nerves, and grafts.
Jeweler’s Forceps
- Features: Very fine tips for precision work.
- Typical Use: Microsurgical handling of vessels and nerves.
Forceps are illustrated below.
When handling delicate tissue (e.g., perforator flap pedicles), select atraumatic forceps and apply only minimal pressure.
Retractors
Retractors provide exposure by gently holding tissues aside; choose the smallest retractor that affords a clear field to minimize tissue ischemia and pressure injury.
Retractors allow the surgeon to visualize deeper structures while leaving both hands free. Skin hooks are delicate single‑prong retractors used to elevate thin skin flaps without damaging dermis. Langenbeck retractors are flat‑ended, right‑angled instruments for retracting deeper soft tissue; they are commonly used in head and neck operations. Cat’s paw or Weitlaner retractors are double‑ended instruments with several prongs; they self‑retain to hold skin and subcutaneous tissue apart during longer procedures. The placement of self‑retaining retractors should be periodically adjusted to relieve pressure and avoid compressive injury.
Retractors are illustrated below.

Release self‑retaining retractors intermittently during long cases to restore perfusion and prevent tissue necrosis.
Scissors
Use the right scissor for the right task: fine scissors for delicate dissection and heavier scissors for cutting sutures. Never use dissecting scissors to cut sutures, as this dulls their blades.
Scissors are classified by their blade length, tip shape and intended use. Tenotomy scissors and Metzenbaum scissors have long, narrow blades with blunt or gently curved tips; they are used for fine dissection and undermining of tissues. Iris scissors are smaller and used for very fine, precise cuts, such as trimming the edges of skin grafts. Mayo scissors are heavier and typically used to cut thick tissues or dressings; there are straight and curved versions. A dedicated suture scissor should be used for cutting sutures; never compromise the sharpness of dissecting scissors by cutting suture material.
To handle scissors, insert the thumb and ring finger into the rings and stabilize the instrument with the index finger on the shaft. This grip allows control during cutting and helps achieve straight, accurate lines.
Electrosurgery
Electrosurgery (Diathermy) uses high‑frequency current to cut and coagulate tissue; monopolar circuits return current through a dispersive pad, whereas bipolar circuits confine current between two tips, limiting collateral damage.
Electrosurgical units (ESUs) generate alternating current at 100 kHz-5 MHz to cut, coagulate, dissect, or fulgurate tissue. In bipolar electrosurgery, both the active and return electrodes are located on the forceps tips; only tissue grasped between the tips completes the circuit, so no dispersive pad is needed. This makes bipolar electrosurgery ideal for precise work near nerves or vessels and for use in a fluid environment, such as wet field cautery.
In monopolar electrosurgery, the active electrode is placed at the surgical site and current flows through the patient to a return (dispersive) pad elsewhere on the body. The dispersive pad dissipates the current to prevent burns; poor contact can cause thermal injury. Monopolar diathermy is versatile and can both cut and coagulate tissue, making it the most commonly used modality. It requires careful pad placement and is avoided in patients with implanted electronic devices when possible.
Pacemakers and implantable cardioverter defibrillators (ICDs) may malfunction in the presence of electromagnetic interference from monopolar electrocautery. Electromagnetic interference can inhibit pacing or trigger inappropriate therapy. Guidelines recommend using bipolar cautery when possible or limiting monopolar bursts to a few seconds and placing the dispersive pad so that the current path does not cross the device. Magnets may be used to reprogram devices, but their effects are variable; device‑specific consultation is advised.
Announce “energy on” when activating diathermy. Confirm pad placement and check for pacemakers or ICDs before using monopolar electrosurgery.
Instrument Safety, Sterility, & Sharps Handling
Maintaining sterility and preventing sharps injuries depends on proper handling, instrument counts, and clear communication. Use hands‑free techniques and checklists to protect both patients and staff.
A sterile instrument remains sterile only if handled correctly. The WHO Surgical Safety Checklist prompts the surgical team to confirm critical tasks before incision and at closure, including verification that instruments, sponges, and sharps counts are correct. Adherence to the checklist reduces surgical complications and adverse events, such as retained instruments or site infections.
Sharps injuries are common when scalpels or needles are passed directly between team members. Establish a neutral zone, a designated area on the mayo stand or a magnetic pad, where sharps are placed and retrieved without hand‑to‑hand passing. Instruments or blades are placed in the neutral zone and verbalized so the receiving person is aware. This “no‑touch” technique significantly reduces suture needle and scalpel injuries.
Instrument counts are performed before incision, at closure of a body cavity, and before skin closure. Counting ensures that all instruments, sponges, and needles are accounted for and prevents retained foreign bodies. Team members should speak up if there is uncertainty about counts or instrument placement. Any contaminated instrument should be isolated to prevent cross-contamination.
Use sterile technique when opening instrument packs; handle only gloved or clamped surfaces; and never place used sharps back on the sterile field without passing through the neutral zone.
Specialized Instruments in Plastic Surgery
Plastic surgery employs specialized tools, such as dermatomes for skin grafts and microsurgical instruments for vessel and nerve repair to achieve precise and aesthetic outcomes.
While a detailed survey of all specialized instruments is beyond the scope of this overview, here's a list of the most important instruments.
- Dermatome and Mesher: A dermatome is a powered or manual instrument that harvests thin slices of skin for grafting. Electric and air dermatomes produce long, uniform grafts with consistent thickness, while drum or knife dermatomes provide manual control for smaller grafts. A mesher is used to expand a harvested split‑thickness skin graft, allowing it to cover a larger surface area.
- Hand Surgery Aids: A lead hand is a malleable metal frame used to stabilize the hand and fingers during delicate procedures; tendon retrievers help retrieve retracted tendons through small incisions. Microsurgical sets include fine jeweler’s forceps, micro‑scissors, micro‑needle holders, and micro clamps to handle tiny vessels and nerves.
- Venous Couplers: These devices mechanically join small veins without sutures; they simplify microvenous anastomoses and reduce operative time. In supermicrosurgery, sutures as small as 11‑0 or 12‑0 may be used to join vessels or nerves.
Organize specialty instrument sets before the case; check that dermatome depth settings, mesher ratio plates and microsurgery sets are complete before sterile draping begins.
Instrument Sets by Phase
Preassembling instrument sets for each phase of surgery improves efficiency and ensures critical tools are available when needed.
Organizing instruments by operative step allows the scrub and surgeon to anticipate what comes next and reduces delays. A typical instrument sequence for a minor plastic surgery procedure might include,
- Preparation: Sponge holders, gallipots or bowls for antiseptic solutions, towel clips, and marking pens. Verify counts and confirm equipment readiness.
- Incision: Scalpel with selected blade (No. 10/11/15) mounted on a No. 3 handle, Adson or DeBakey forceps, and small retractors (skin hook or Langenbeck) for exposure.
- Exploration and Exposure: Deeper retractors (Langenbeck or Cat’s paw) and atraumatic forceps to gently separate tissues. Use of suction or irrigation may be necessary to keep the field clear.
- Dissection: Tenotomy or Metzenbaum scissors for sharp or blunt dissection; electrosurgery (preferably bipolar near critical structures) for coagulation. For pedicle dissection, micro‑instrumentation may be required.
- Closure: Needle holders matched to the chosen suture size, fine forceps for dermal approximation, suture cutters or Mayo scissors for trimming ends, and skin adhesives or strips. Confirm final counts before dressing the wound.
Think one step ahead; while closing the wound, ensure suture removal instruments or dressings are available for the next case.
Conclusion
1. The Ability to Identify: The main categories of surgical instruments (scalpels, forceps, retractors, scissors, electrosurgical devices) and match them to each operative phase.
2. Differentiating: Between monopolar and bipolar electrosurgery, understand their current pathways and safety implications, and apply precautions for patients with pacemakers or ICDs.
3. Maintaining: Sterility and sharps safety by adhering to the WHO Surgical Safety Checklist, establishing a neutral zone, and performing complete instrument and sponge counts.
4. The Ability to Select: Appropriate instruments for specialized plastic surgery tasks, such as skin graft harvest with dermatomes and microsurgical repair with fine forceps and micro‑scissors.
5. Effectively Communicating: With the operative team to anticipate instrument needs, ensure patient safety, and respond confidently to questions encountered on the ward, in clinic and in theatre.
Further Reading
- World Health Organization (2009) Surgical safety checklist. Geneva: World Health Organization.
- King, J. (2023) Neutral zones: the bordered region. AORN Journal [online], 14 November. Association of perioperative Registered Nurses.
- Cordero, I. (2015) Electrosurgical units - how they work and how to use them safely. Community Eye Health, 28(89), pp. 15–16.
- Neelankavil, J.P., Thompson, A. & Mahajan, A. (2013) Managing cardiovascular implantable electronic devices (CIEDs) during perioperative care. Anesthesia Patient Safety Foundation Newsletter, 28(2), Fall.
- Buckner, B. (2023). Scalpels. Journal of Medical Insight (JOMI), 2023(300.1). doi:10.24296/jomi/300.1.
